Welcome to Omamori FAQ page, you could navigate the table of content on the left and view the topics matching your needs. If you cannot find answers for your questions, you could contact us at support@labo00.com. We will reply you asap.
Users could integrate omamori scripts and software to their computers1 and accounts2, so that omamori can notify you3 when your devices are being logged in. You can also lock your devices out so that no one could login your devices even they got the right password1. It can prevent the data in your notebook being accessed when it is stolen.4 With some setup, omamori could also be used in honeypot and traps to identify hacking activities.
Remark:
- We currently supported Windows5, Mac6 and linux6.
- Please consult your service provider for omamori support. If you were the developer, you could check out our API document to integrate our service.
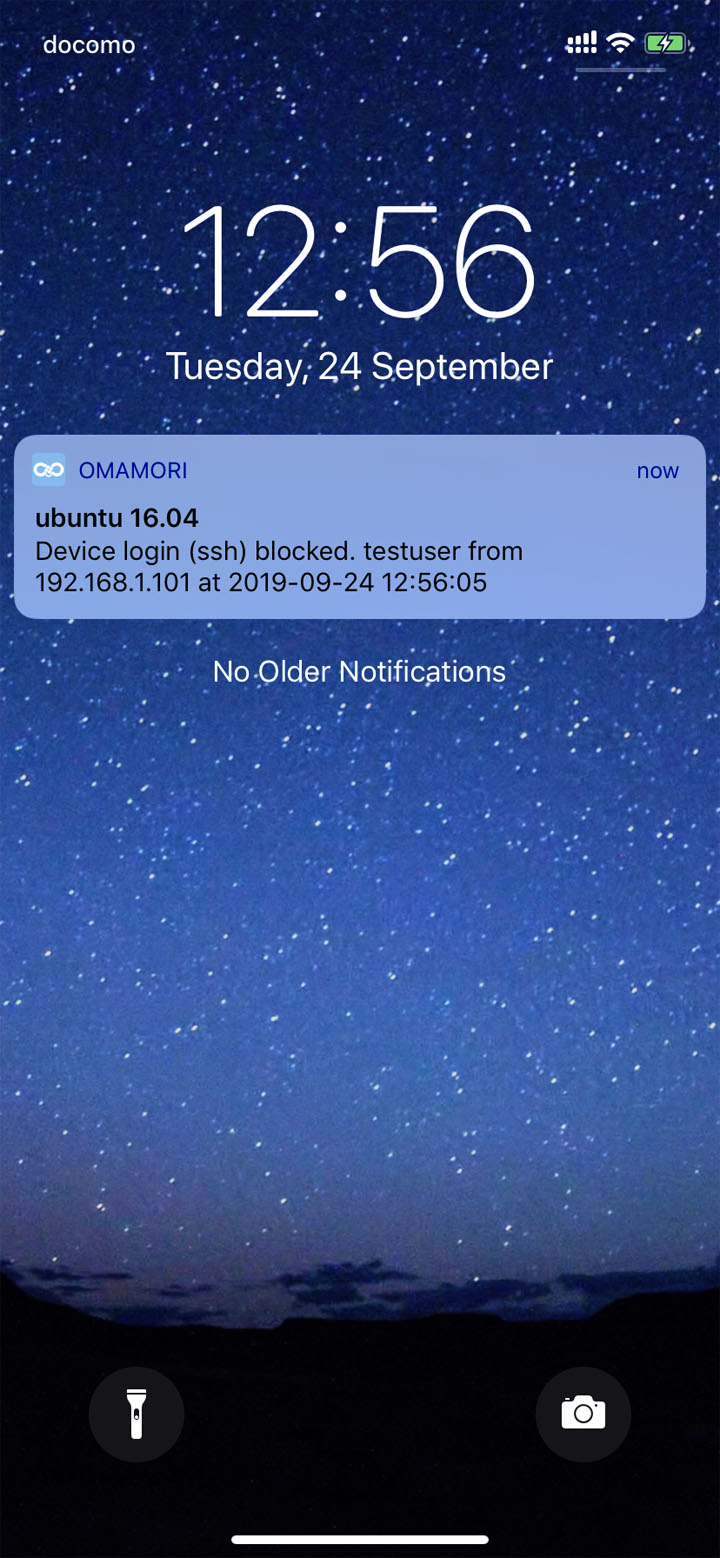
- Notification includes Email notification and mobile phone notification (currently applied to iOS devices installed Omamori app logged into corresponding account. Android app is under development).
- Omamori could detect and kick user out for login events undergoing OS login process. Please apply harddisk encryption like BitLocker in Windows to prevent direct access to harddisk data.
- Tested platform: Windows 7 SP1, Windows 10, Windows Server 2012R2, Windows Server 2016, Windows Server 2019
- Tested platform: macOS Mojave
- Tested platform: Ubuntu 18.04/16.04/14.04, Fedora 30, CentOS 7
For supported devices, you can get notification1 when your devices startup, shutdown and being logged in. You could extend the notification and autolocking functions to your self-developed web applications if you subscribed premium service.
Remark:
- Notification includes Email notification and mobile phone notification (currently applied to iOS devices installed Omamori app logged into corresponding account. Android app is under development).
We support Windows1, Mac2, Linux3 and different self-developed web applications4. If you had major OS platform want us to support, please drop us a mail on inquiry@labo00.com. We will review and consider your suggestion.
Remark:
- Tested platform: Windows 7 SP1, Windows 10, Windows Server 2012R2, Windows Server 2016, Windows Server 2019
- Tested platform: macOS Mojave
- Tested platform: Ubuntu 18.04/16.04/14.04, Fedora 30, CentOS 7
- If your application supports internet connection and can send/receive POST/GET request, you could integrate the notification and autolock service to your product. For how-to details please refer to FAQ page.
Using omamori is simple.
| 1. | Register an omamori account |
| 2.1 | For Windows, download and install an agent on your computer |
| 2.2 | For Linux, follow instructions and setup corresponding script on your computer |
| 2.3 | For web application, follow instructions and integrate the omamori API in your code |
| 3. | Get and install Omamori app1 |
| 4. | Great, You are done! |
Remark:
- We currently provide iOS app. Android app is under development
For every account, users can register 5 devices for free with basic services.
If users wanna register more devices, users need to pay US$0.99 or JPY¥120 per year for each device (tax included). We support Paypal (via omamori web portal) and Apple iTunes store (via iOS App) payment.
Users could pay an extra US$0.99 or JPY¥120 per device to upgrade to premium service1. The premium service expires after 1 year or ends with the subscription expire date, the earlier date applied.
Remark:
- Custom Actions only works on devices upgraded to premium services.
Users could simply delete the device in omamori portal and remove omamori applications/codes/scrips installed on your device to stop the service. But we do not provide any refund for paid but not yet expired service.
Indeed we are opened to any kind of business cooperation. In general we support the following 2 kinds of application:
- Company could deploy the whole omamori client-server service into their self intranet. Administrator can define custom services and monitor all corresponding activities within the network. Tailor-made reports could also be provided.
- We welcome cooperation and integration of network devices and web services, e.g. NAS, IP-Cam, Forum, Financial applications, etc. So that users could use self omamori account to get notifications and autolock features (if applicable).
If your are interested, please contact us on inquiry@labo00.com for a discussion.
For items meeting the following criteria, please drop us a mail to support@labo00.com. We will feedback you asap.
| Bug Report | If possible please describe as much detail as possible of the situation and how to produce. |
| Payment Issue | Please provide us the payment platform, Order ID (if possible), payment date and time, and purchased content for us to follow. |
We will try our best to reply your mail. But please accept our appologise if we are not able to provide response in case inquiries were too many. For other issues, please send your mail to inquiry@labo00.com. Thanks very much.
Thanks for choosing omamori. labo00 LLC (hereafter referred to as "labo00" or "we") hopes omamori could help secure your devices from malicious users. But we would also like to tell you our limitations and liability, your rights and issues you might meet while using omamori service.
labo00 in principle agrees any kind of hardware/software connect to omamori by using API conforming to our specification. Omamori users could use omamori provided installers/scripts or non-official agents/scripts conforming to omamori service API to use omamori service. Hardware/software developers are not restricted to integrate code calling omamori API into their products and resell to their customers. But for anyone distributing any hardware/software able to use omamori service should acknowledge their users this Terms of Service and get their acceptance before using omamori service by any means.
labo00 does not limit number of API calls per device using omamori service. But labo00 reserves the rights to disable and terminate our service on devices making unusual number of API calls which might affect other users' usage without any refund. Accounts might also be locked out if being justified abusing the service by labo00. labo00 will not refund affected users.
labo00 takes appropriate steps to keep omamori service alive 24x7 for our users. However in case of disasters and hardware failure, users might have chance not able to use omamori service. We could only commit we would try to put omamori online again as soon as we could. Data might also get lost if changes was make after previous backup session.
We do not share any personal information with third parties. All information collected would only be used within labo00. Unless getting user consent or required by law or regulations, we would not disclose user information to parties not regconized by our customers.
An user email address used for registration, processing forgot password and receiving notification is required. In case there is changes in our privacy policy or terms of service, we will also use the registered email to inform our users.
In omamori, we use Cloudflare DNS (1.1.1.1) to get ping status. Besides, we use ip2c.org service to resolve users' countries. Please refer to their privacy policy and terms of use if you had any concern.
labo00 aims to provide best services and user experience to our users. Although we had performed various tests and taken different considerations in our software to provide security at the same time prevent causing any inconvenience to our users, we could not 100% guarantee the software behaves consistent across different machines as it behaves in our testing environment. In worst case, with wrong configurations, the omamori software could lock you out and you can no longer login your device.
Please justify and use the service at your own risk. labo00 will bear no responsibility for any loss or trouble caused by using our software or service.
We accept Paypal (web portal) and In App Purchase (via Omamori iOS App in Apple App Store). After payment, users will be able to register more device(s), or upgrade current device(s) to premuim service with an expiry date. Users could remove their devices from omamori portal and stop using omamori service at any time they desire, but there would not be any refund for unused subscription(s) and period. In case there is issue (e.g. network instability) during purchase process leading to incomplete purchase situation, omamori users could contact support@labo00.com to complete the order.
If you had any concern, you could send us a mail in contact us page and we will return to you as soon as possible.
labo00 LLC (hereafter referred to as "labo00" or "we") cares about your privacy and information. We recognize our responsibility and are committed to the security and privacy of our customers. If you had any concern, you could send us a mail in contact us page and we will return to you as soon as possible.
labo00 collects only user IP address, browser agent information and browsing activities within labo00.com for analysis and user experience improvement purposes. No personal information of individuals would be determined.
For website visitors, we do not require and collect any user personal information. For our clients, we will ask for information required to perform corresponding services under user consent.
For omamori users, an email address used for registration, forgot password and receiving notification is required. In case there is changes in our privacy policy or terms of service, we will also use the registered email to inform our users.
We do not share any personal information with third parties. All information collected would only be used within labo00. Unless getting user consent or required by law or regulations, we would not disclose user information to parties not regconized by our customers.
labo00 takes appropriate steps to protect the personal data we hold against loss, disclosure, unauthorized access, modification and improper use. We hope you understand though that, despite our efforts input, no security measures can be guaranteed 100% impenetrable.
In order to provide omamori service, we use cookie to store user session information. Cookie is a small piece of data sent from a website and stored on the user's computer by the user's web browser while the user is browsing. You can disable use of cookie in your browser, but you will not able to use omamori web portal service.
Our website implements Secure Sockets Layer (SSL) encryption to protect user privacy and data integrity while visiting our sites.
In omamori, we use Cloudflare DNS (1.1.1.1) to get ping status. Besides, we use ip2c.org service to resolve users' countries. Please refer to their privacy policy and terms of use if you had any concern.
labo00 LLC (hereafter referred to as "labo00" or "we") aims to provide best services and user experience to our users. Although we had performed various tests and taken different considerations in our software to provide security at the same time prevent causing any inconvenience to our users, we could not 100% guarantee the software behaves consistent across different machines as it behaves in our testing environment. In worst case, with wrong configurations, the omamori software could lock you out and you can no longer login your device.
Please justify and use the service at your own risk. labo00 will bear no responsibility for any loss or trouble caused by using our software or service.
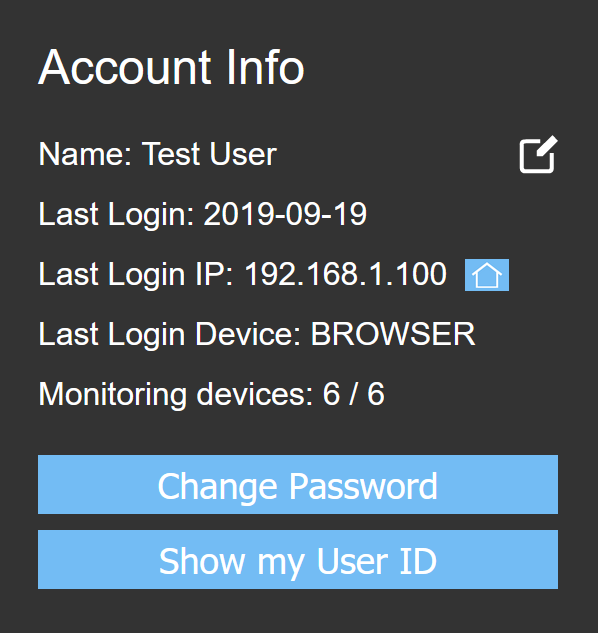
When login, you could find your Account Panel on the left of the browser.
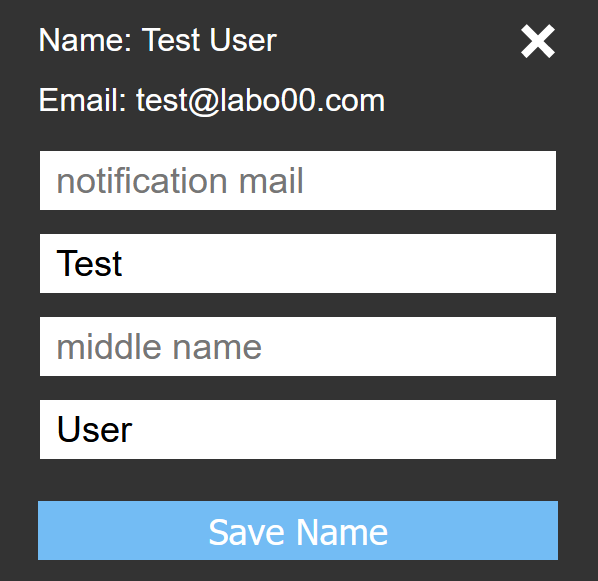
Name (Optional)
Specify the name you prefer us calling you. It is optional.
You can click the edit icon  to edit your name and notification mail address. The notification email can be different from your login mail address and it will be used to received email notification only.
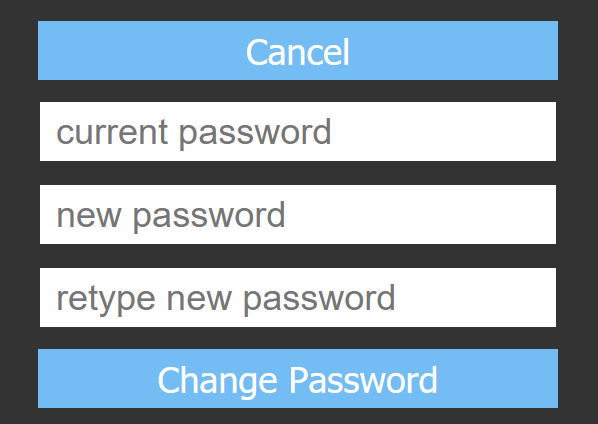
You can change your password by clicking the Change Password button.
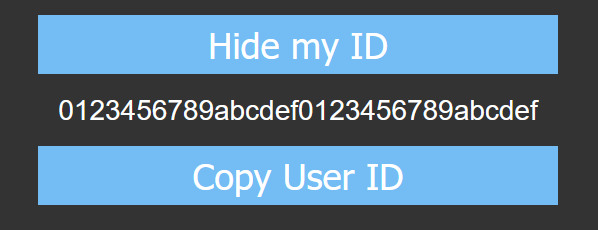
You need to know your User ID for registering your devices. Simply click Show my User ID button and you can find your 32 digit User ID. Please keep it confidential to prevent other users registering devices to your account.
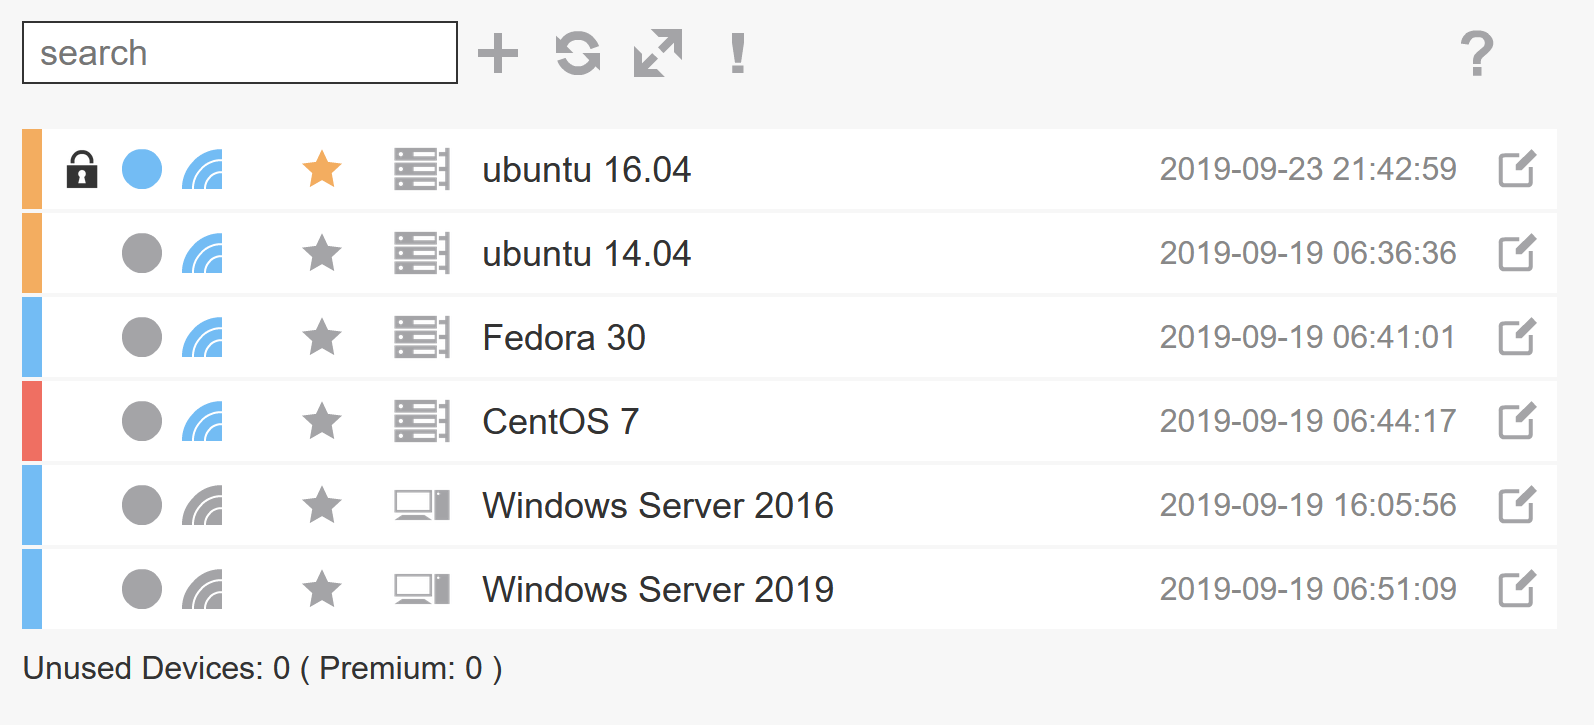
 Filter shown devices.
 Add device to omamori.
 Update devices status.
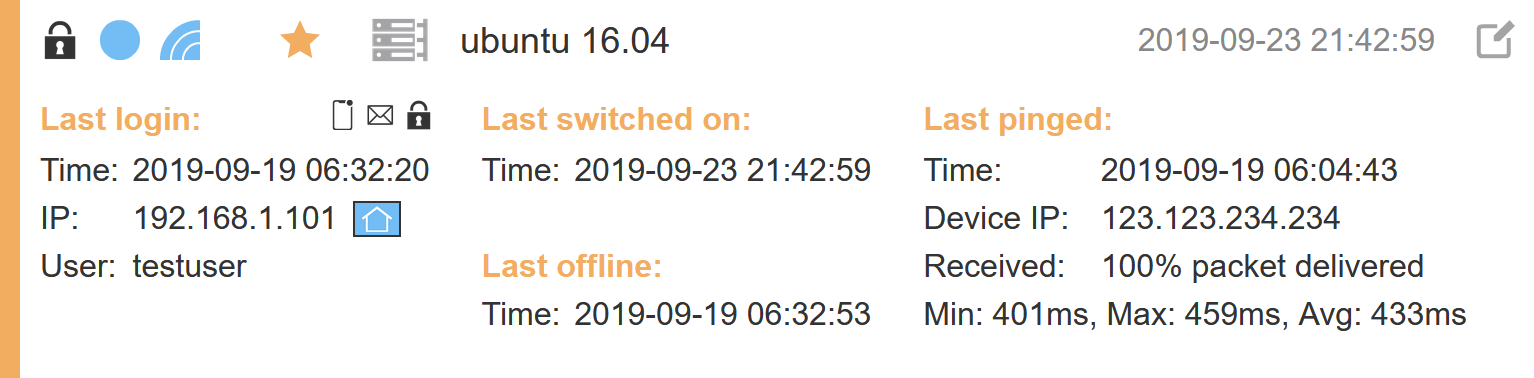
 Expand all rows to show more information.
 Show errors.
Unused Devices
Show available vacancy for device registration. Every account will get 5 free devices with basic functions.
Premium
Show available premium vacancy for device registration.

 Indicate if the device enabled autolock or not.
 Show device on/off status.
 Show device network status, based on ping response time.
 Indicate if premium service is subscribed or not.
 Edit button.
 Show enabled services.
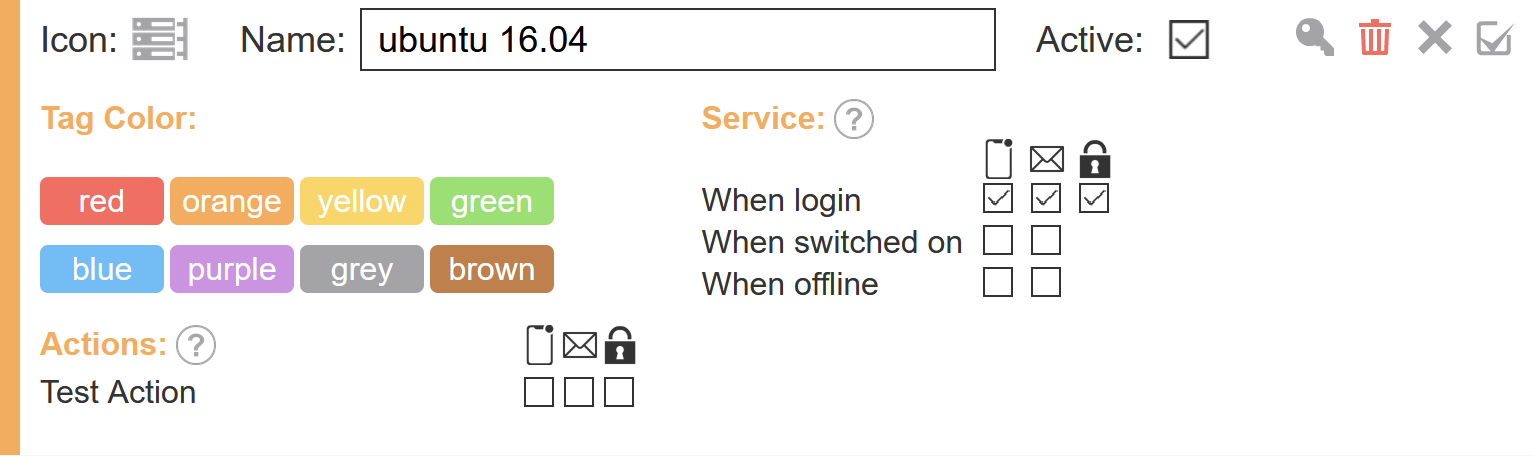
Icon
Change the icon of the device.
Name
Change the name of the device.
Color
Change the color of the device.
Active
Turn the services on this device on/off. Please be reminded that if the device is turned inactive, besides ticking the checkbox here, you are required to register the device again to make the device active.
 Show device Rescue Key.
 Delete device. Irreversible.
 Cancel all changes and exit edit mode.
 Save changes and exit edit mode.

Setup Custom Actions service flags. Only effective in devices upgraded to Premium service.
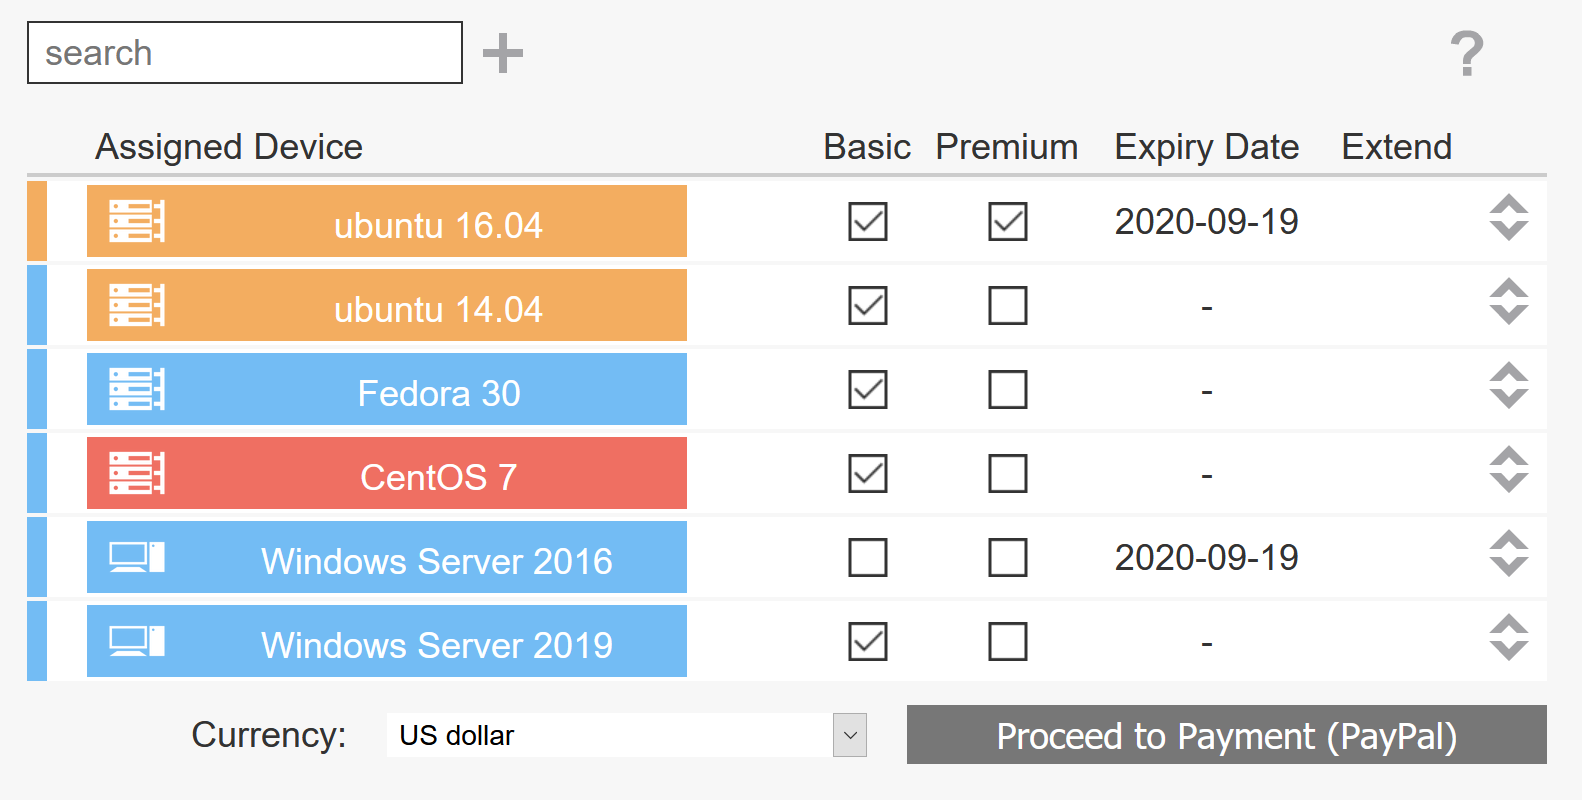
Filter shown devices.
Purchase service for new device.
Currency
Currency for subscribing new services. We support USD and JPY.
Proceed to Payment
If you added new items or checked new premium boxed, you can continue your payment thru this button. You can also do such purchase within your iOS app.

 You can drag the device to other subscriptions to make good use of free and premium services.
Basic
Indicate if the item is 1 of 5 free devices provided to the account.
Premium
Indicate if the item had upgraded to premium.
Expiry Date
Show the expiry date of premium or subscribed service.
 You can drag the icon here to change device ordering. The change will be reflected in Device Panel.
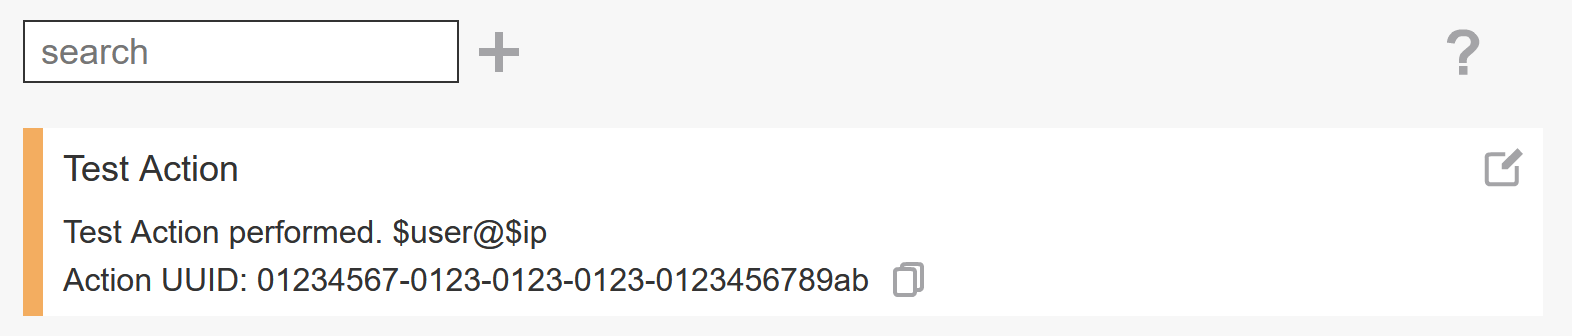
Edit button.
 Copy button for copying the Action UUID.

 Turn the action active/inactive.
Delete action. Irreversible.
Cancel all changes and exit edit mode.
Save changes and exit edit mode.
name
Set action name.
action string
The text sent out in notification and email when action is triggered with action autolock flag disabled. You can use $user to get luser value, $ip to get lip value and $dt to get api calling time.
action string when lock
The text sent out in notification and email when action is triggered with action autolock flag enabled. You can use $user to get luser value, $ip to get lip value and $dt to get api calling time.
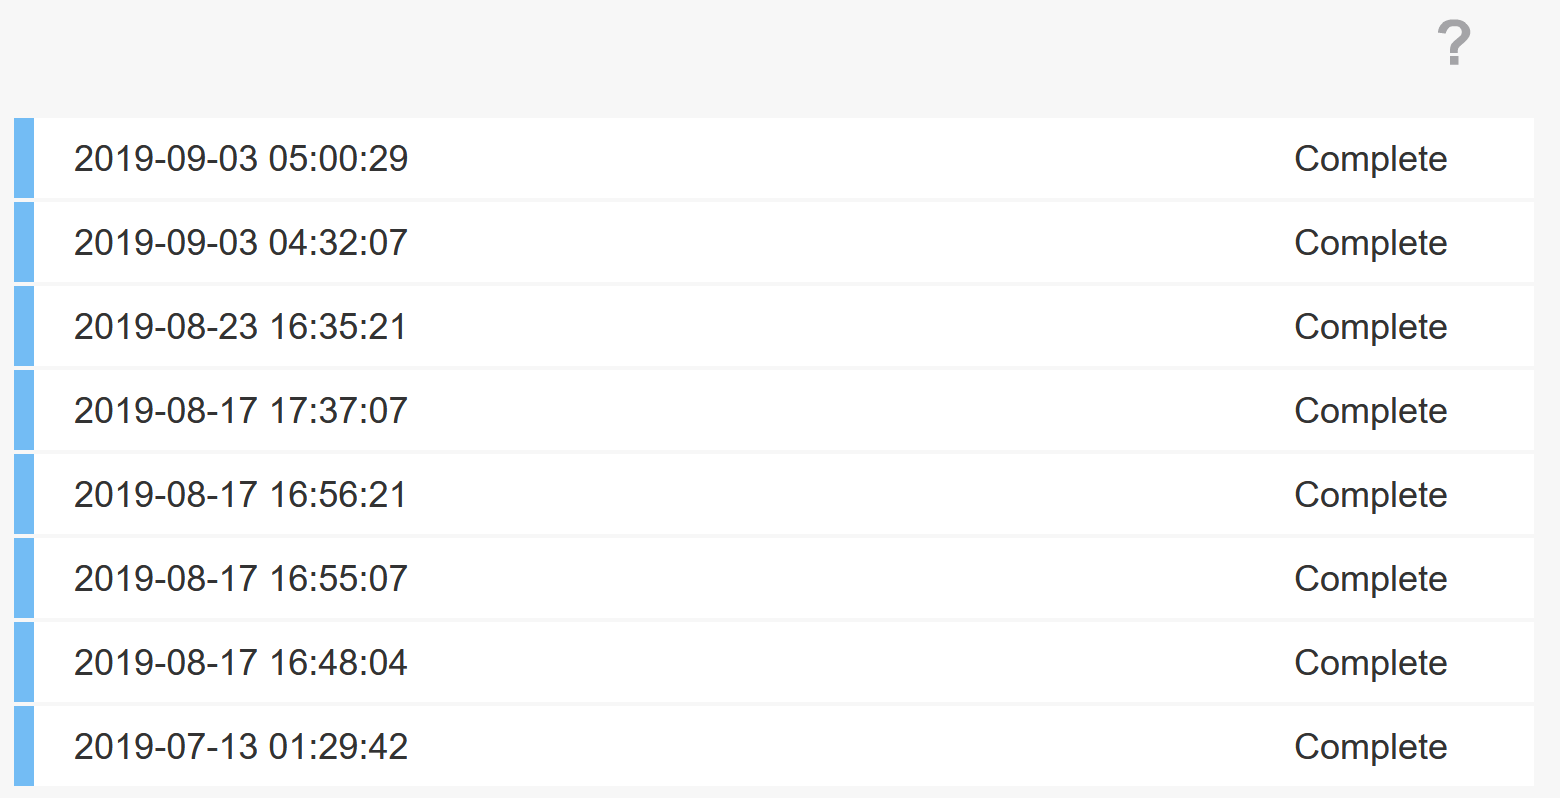
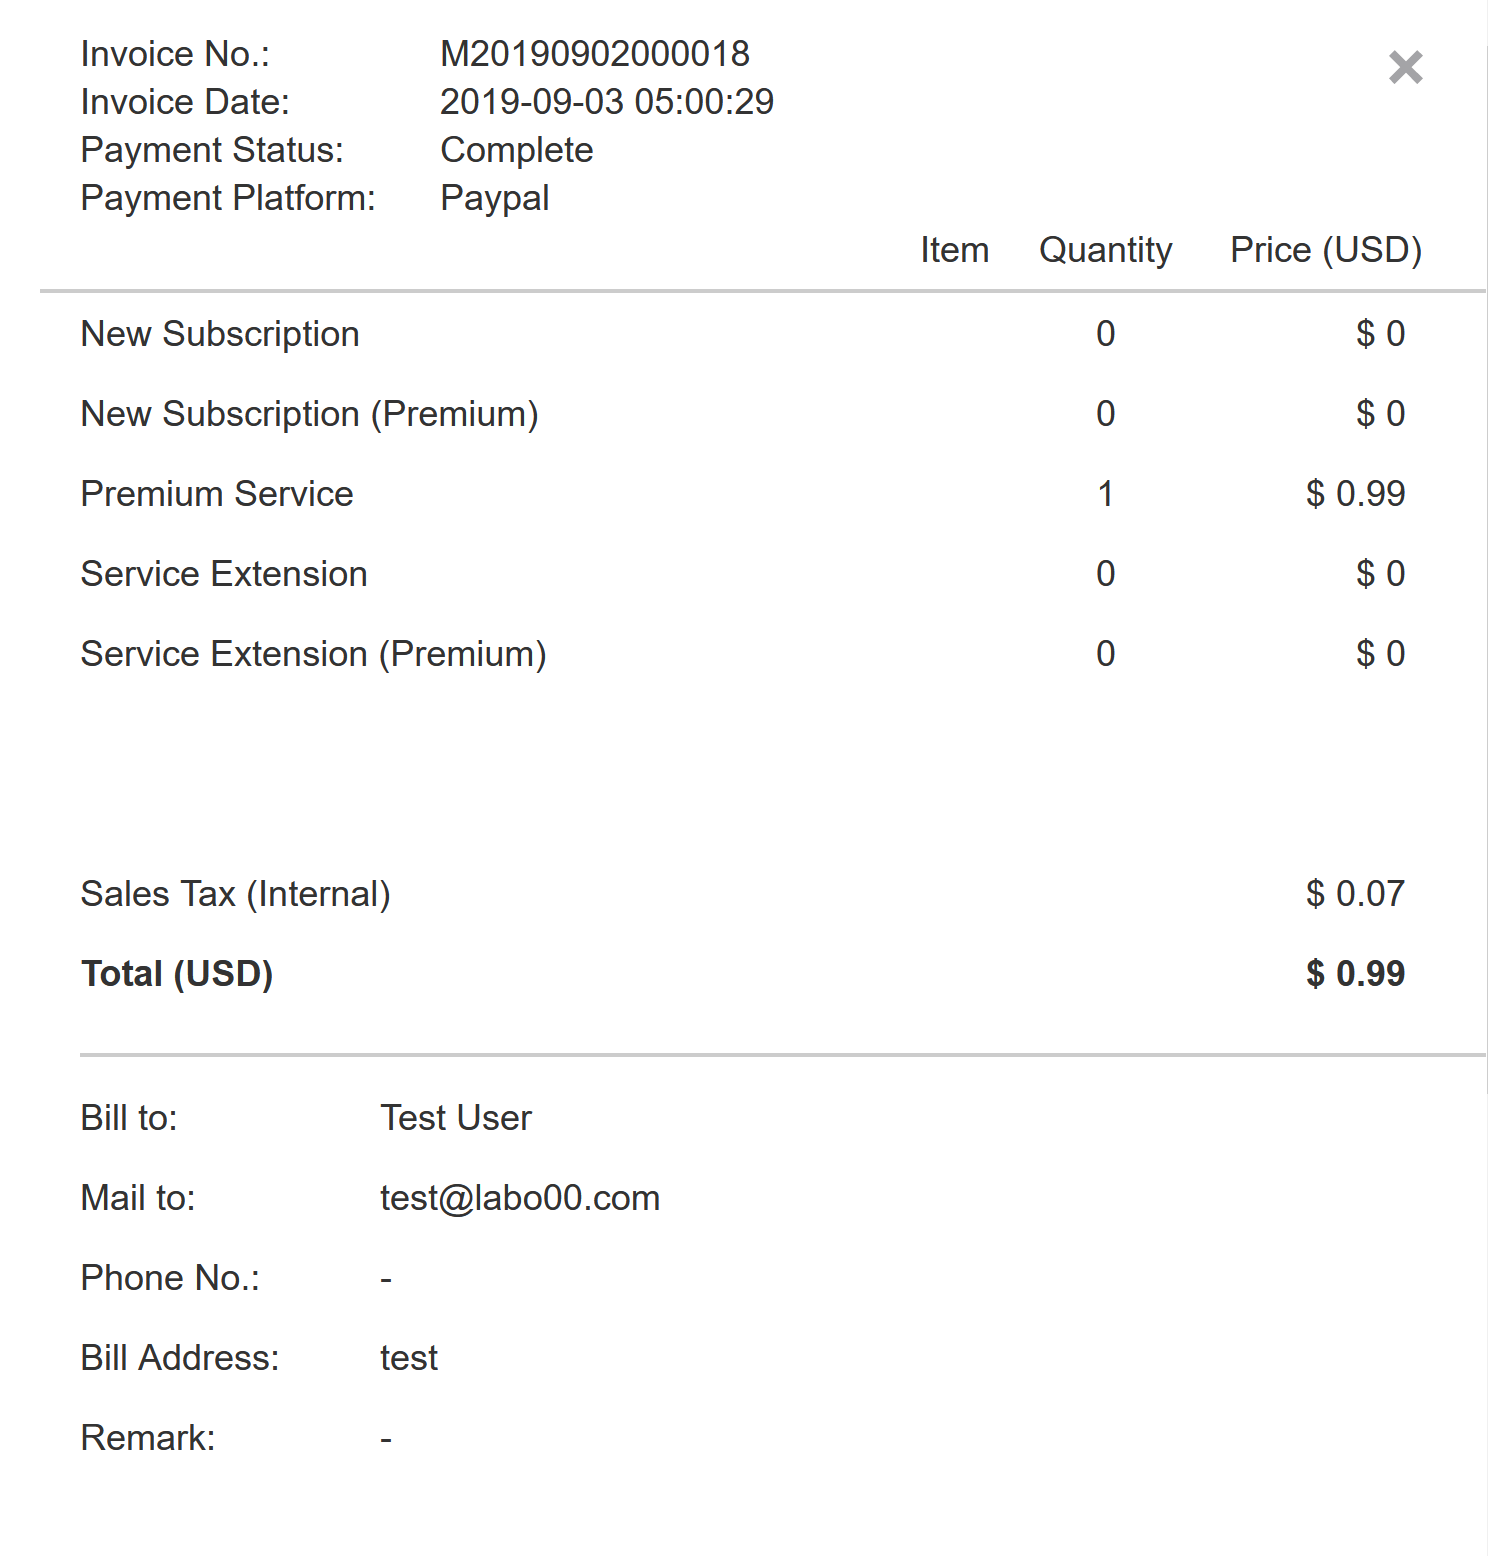
You can view all your payment records here.
Get our mobile app to get mobile notification and manage your devices and accounts conveniently. Android app is under development and will be released soon.


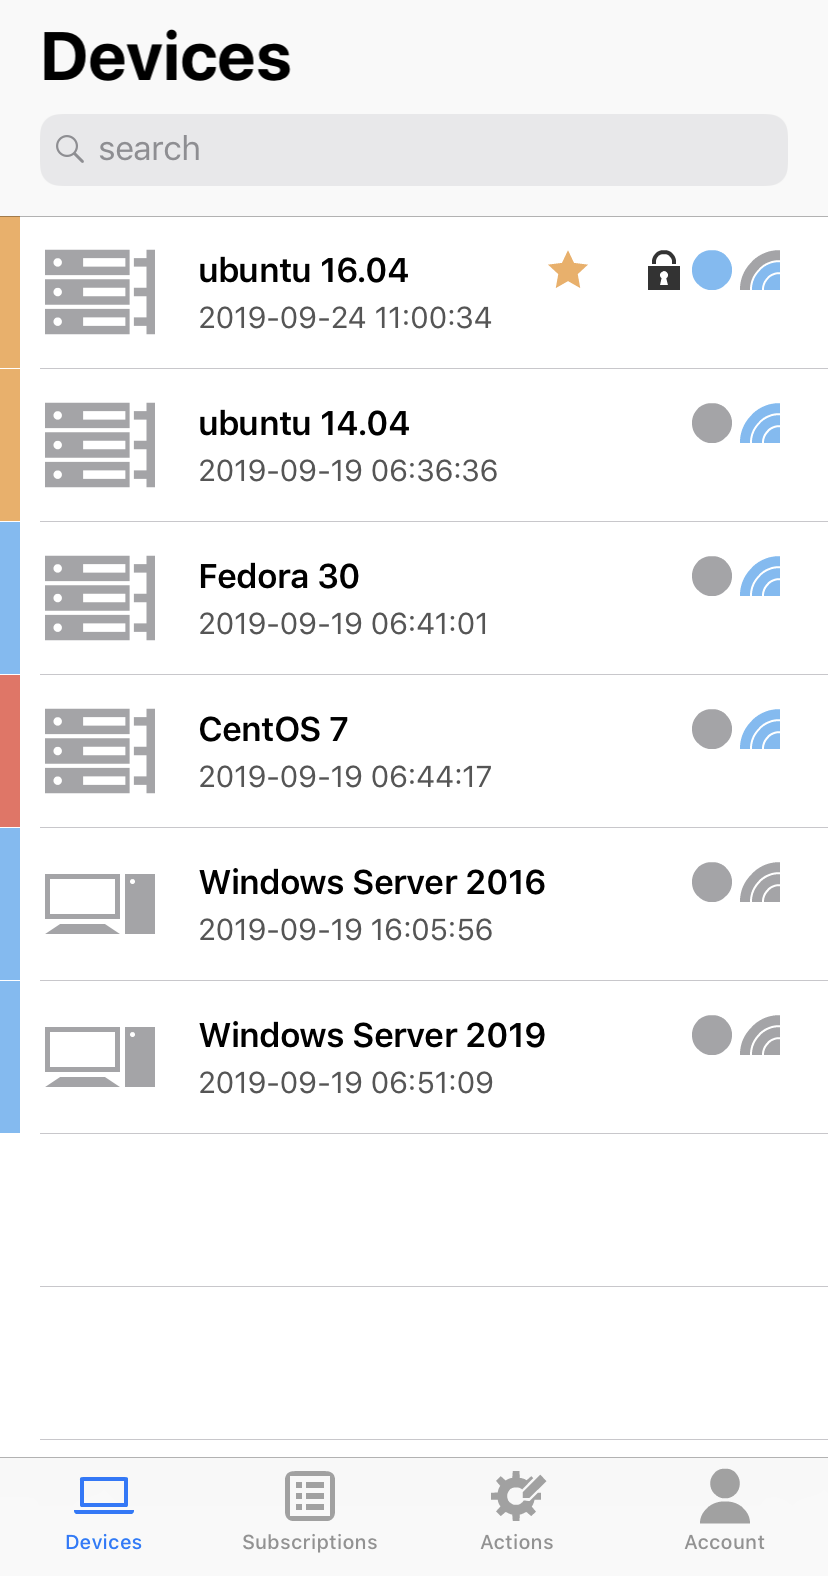
Indicate if premium service is subscribed or not.
Indicate if the device enabled autolock or not.
Show device on/off status.
Show device network status, based on ping response time.
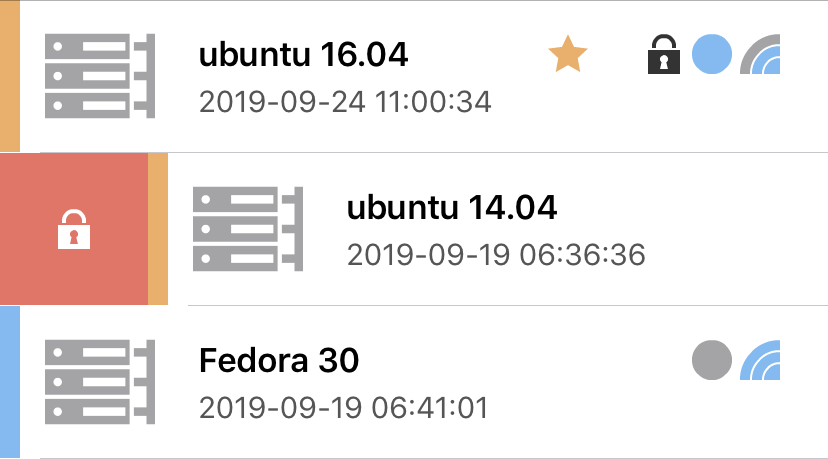
You can enable/disable autolock by simply sliding the device to right.
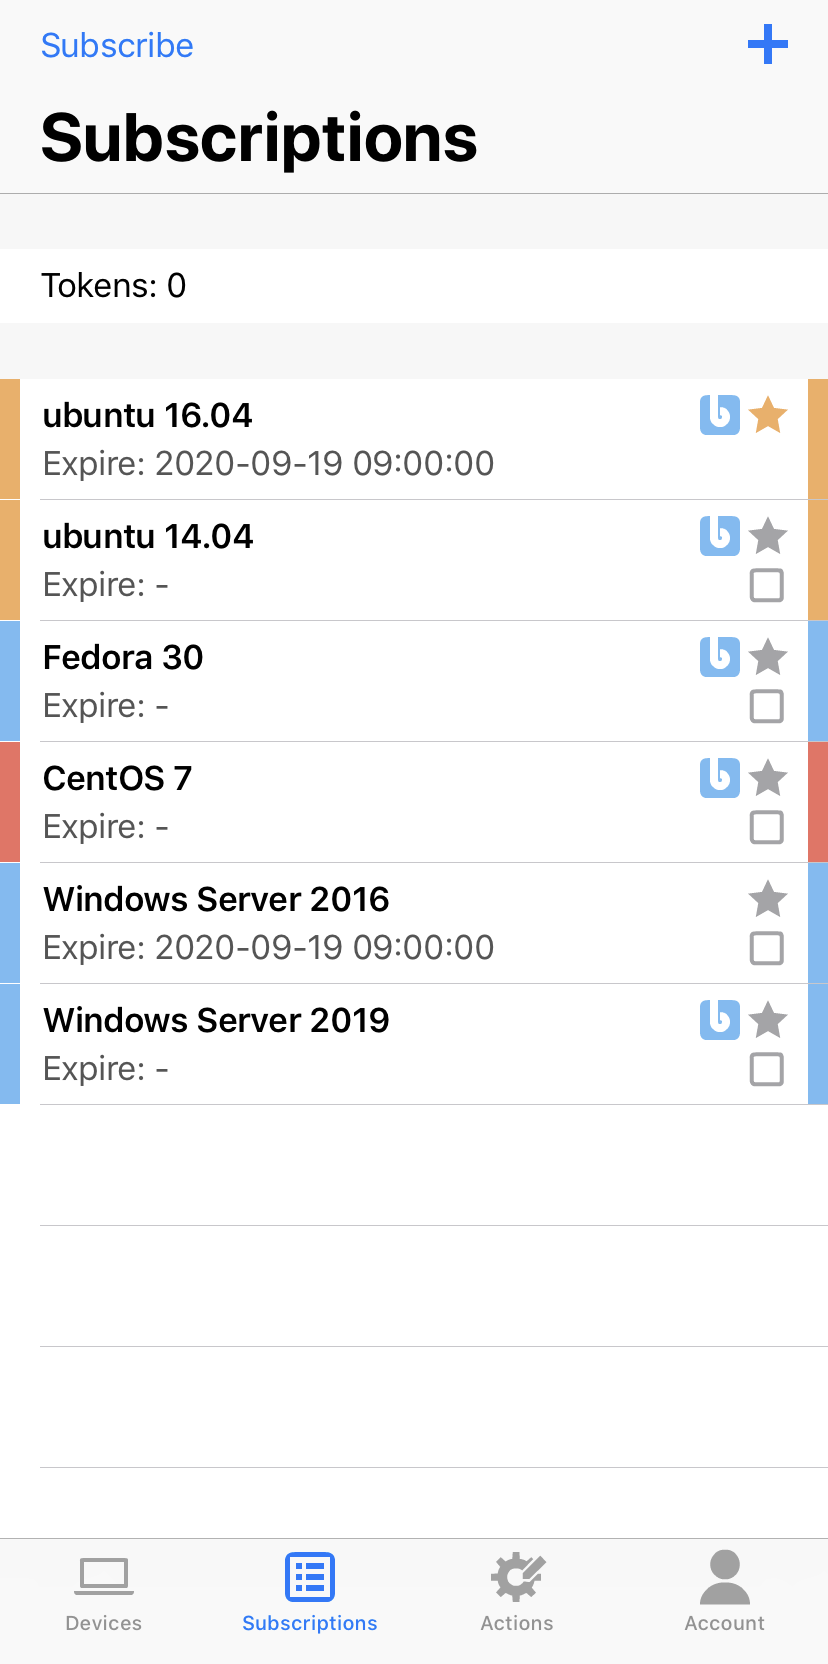
Tokens
In mobile apps, users are required to first purchase the tokens, then use the tokens to buy desired services.
 Indicate if the item is 1 of 5 free devices provided to the account.
Indicate if premium service is subscribed or not.
 Indicate if you had selected the device upgrading to premium.
 Purchase service for new device.
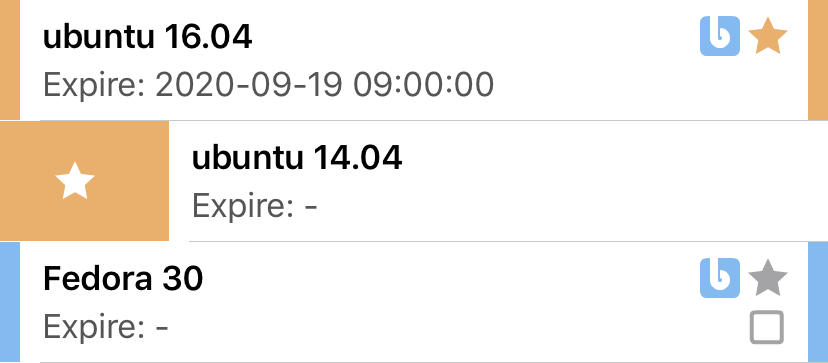
You can upgrade the device to premium by sliding the device to right.
 Proceed buying/upgrading services with purchased tokens.
Prerequistie:
Your windows should be able to connect to internet automatically when startup. And you should not have disabled the USB Automount feature. Otherwise you might lock your windows forever.
1. Before downloading and installing windows agent, please ensure you have read and understand our Disclaimer, Privacy Policy, and our Terms of Service.
2. Download the omamori windows installer. During download, your antivirus might prompt for malware alert, please allow exception for it.
3. Verify downloaded installer using CertUtil
In Windows command prompt:
CertUtil -hashfile <pathToOmamoriInstaller.exe> MD5MD5 hash of the installer, check if MD5 calculated by CertUtil matched with our provided hash:
0f6d3cb9b0ca72426f03272f37a3075f4. Follow the instruction and install the installer. When completed, open omamori, input your "User ID" and click "Register". You can then refresh the portal and see your windows appeared on the screen.
Remark: For Windows 7, please be reminded to install as administrator.
5. Congratulations, you are done. For how to use omamori service in windows machine, please visit using Windows agent page for details.
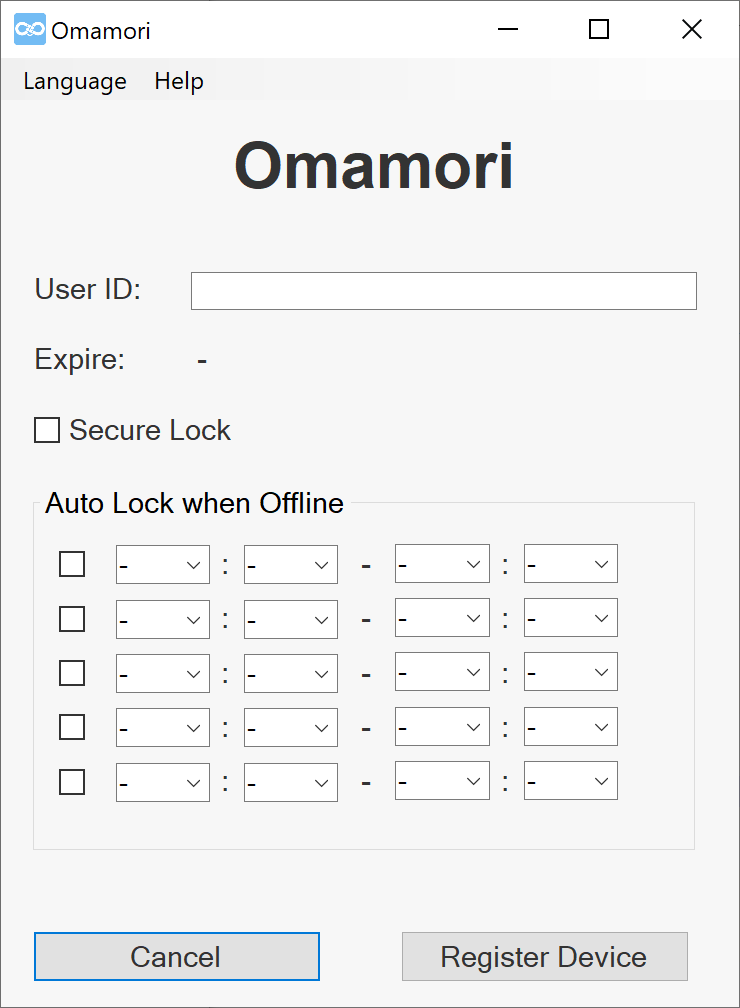
To launch Omamori, you should run it as administrator. When it is launched, you should be able to see the screen below.
Language
You can change the language here.
Help
You can access this page with Help > How to Use
User ID
You should input your User ID in this field and click "Register Device" to register your Windows device to Omamori. This field will become readonly after registered.
Expire
This shows the expiry date of your subscription period.
Secure Lock
In omamori autolock mechanism, when an user tries to login windows, omamori will consult Omamori server if the device enabled autolock. Omamori will log user off after getting server response.
This process might take several seconds depends on network condition. When enabling Secure Lock, omamori will log user out immediately before checking with Omamori server. This reduces the time needed to kick unauthorized user out.
But its drawback is even the device autolock had been disabled, users will still be logged off once when performing login action. Omamori will release Secure Lock for 60seconds after it verified autolock status in Omamori server.
Please be reminded that when device is offline, Secure Lock will always log user out. The only method to login is using Rescue Key.
Auto Lock when Offline
By default omamori will not log user out when Windows is offline. But users could exforce device lock when offline to prevent malicious users bypass omamori protection by disconnecting the device from internet.
Users could lock the device by checking the checkbox and specify the locking time, e.g. enable locking if offline during 07:00-19:00. You could set the time to 00:00-00:00 to enable 24hour lock.
This could be bypassed with Rescue Key
Rescue Key
In case of misconfiguration or due to internet issue results in device lock out and users cannot login the windows device, users can use rescue key to bypass omamori locking.
1. Retrieve the rescue key from omamori portal.
2. Save the key into a file named "omamori.txt" and store it in an usb drive.
3. Switch on Windows device, plug the usb drive into the machine.
4. If automount of usb drive is not disabled in Windows, users should be able to login the device again.
Windows agent by design not supporting modification to use custom actions. If you would like to apply custom actions on your windows machine, please refer to Using Custom Actions with Omamori API section and build your own code.
Below are issues we discovered so far on Omamori Windows agent. Please report to us by sending email to inquiry@labo00.com if you encountered any new problem.
1. During remote desktop connection, sometimes the login user IP cannot be resolved properly and will return 127.0.0.1 or 48.46.48.46.
2. Very oftenly users will not be able to get a device offline signal. It is because before sending out the signal, windows network interface had been turned off. Although there is solution to tackle such situation, it will delay the shutdown time drastically and thus not implemented. If shutdown signal is critical to your usage, please send us a mail on inquiry@labo00.com. We will release an altered version for you to choose from.
CAUTION:
Applying below scripts requires certain level of unix/linux knowhow. Please properly backup your Mac before applying any changes. Please justify and use the script at your own risk. labo00 LLC will bear no responsibility for any loss or trouble caused by using the scripts and commands.
1. Create omamori script:
		sudo mkdir /Library/labo00/

		sudo mkdir /Library/labo00/omamori/

		sudo chmod 755 /Library/labo00/

		sudo chmod 755 /Library/labo00/omamori/

		sudo vi /Library/labo00/omamori/omamori.sh
2. Copy and paste below script into omamori.sh copy
#!/bin/bash
#Developed by labo00 LLC, 2019
#Users should read and follow Omamori website official instruction before editing this file
#labo00 LLC bears no responsibility for any damages or loss caused by using this script
config="/Library/labo00/omamori/omamori.config"
. $config
if [[ ( "$isActive" = false && $1 != "register" ) ]]; then
exit 0
fi
statusUpdate="9b141dd5-7f5e-4ea8-8d8d-18a0be6a3414"
statusLogin="9e13cbfc-bc49-45ec-a7a8-17a2f08887e3"
statusSwitchon="207686ee-3bb7-4ea9-a8b5-bceffd3b7745"
statusShutdown="f7a6fc86-f567-43a2-a883-a9de16e9f6a6"
statusServicestop="ef22ffea-243e-4717-992d-ec3903f192d7"
statusConfirmURL="9ec87f22-042b-42fd-bcaa-d675ffd20e9c"
data1="device=$device&user=$user&type=$deviceType&version=$version"
dt=`date '+%Y-%m-%d %H:%M:%S'`
if [[ ( $# -eq 0 || $1 = "update" || $1 = "register" ) ]]; then
pRes=$(/sbin/ping -qc4 $pingTarget 2>&1)
data2=$(/bin/echo $pRes | /usr/bin/perl -nle'print $1 if m{(\d+) packets received}')
data3=$(/bin/echo ${pRes//\//;} | /usr/bin/perl -nle'print $1 if m{(\d+\.\d+;\d+\.\d+;\d+\.\d+)}')
data4=""
if [ $1 = "register" ]; then
data4="&rescue_key=$rescueKey"
fi
res=$(/usr/bin/curl --data "$data1&update_status=$statusUpdate&ping=$data2;$data3$data4" $uri)
msg=$(/bin/echo $res | /usr/bin/grep -o -E '\"msg\":\"device [a-z]+\"' | /usr/bin/awk -F\: '{print $2}')
expired=$(/bin/echo $res | /usr/bin/grep -o -E '\"expired\":\"[YN]\"' | /usr/bin/awk -F\: '{print $2}')
deleted=$(/bin/echo $res | /usr/bin/grep -o -E '\"deleted\":\"[YN]\"' | /usr/bin/awk -F\: '{print $2}')
active=$(/bin/echo $res | /usr/bin/grep -o -E '\"active\":\"[YN]\"' | /usr/bin/awk -F\: '{print $2}')
if [[ ( $msg = '"device expired"' || $msg = '"device deleted"' || $msg = '"device inactivated"' ) ]]; then
/usr/bin/sed -i 's/isActive=true/isActive=false/g' $config >/dev/null 2>&1
elif [[ ( $1 = "register" && $expired = '"N"' && $deleted = '"N"' && $active = '"Y"' ) ]]; then
/usr/bin/sed -i 's/isActive=false/isActive=true/g' $config >/dev/null 2>&1
fi
elif [ $1 = "login" ]; then
luser=$(/usr/bin/whoami | /usr/bin/sed 's/&/\&/g; s/</\</g; s/>/\>/g; s/"/\"/g; s/'"'"'/\'/g')
ltype="mac"
lip="127.0.0.1"
lcountry="LOC"
if [[ ( $# -gt 1 ) ]]; then
lip=$2
fi
laction="N"
#Check Internet Connectivity
if ! /sbin/ping -c 1 $pingTarget &> /dev/null
then
if [[ ( $autolockWhenDisconnected -eq 1 ) ]]; then
/bin/launchctl bootout user/$(/usr/bin/id -u `/usr/bin/whoami`)
exit 0
fi
fi
if [ "$lip" != "127.0.0.1" ]; then
lcountry=$(/usr/bin/curl -sS --max-time 5 https://ip2c.org/?ip=$lip | /usr/bin/cut -d';' -f3)
if [ "$lcountry" = "ZZZ" ]; then
lcountry="LOC"
fi
fi
if [ $autolock -eq 1 ]; then
laction="A"
fi
aFlag=$(/usr/bin/curl --data "$data1&update_status=$statusLogin&ldate=$dt&lip=$lip&lcountry=$lcountry&luser=$luser<ype=$ltype&laction=$laction" $uri | /usr/bin/grep -o -E '\"actionFlag\":\-?[0-9]+' | /usr/bin/awk -F\: '{print $2}')
if [[ ( $aFlag -eq 1 ) ]]; then
if [[ ( $autolock -eq 1 ) ]]; then
/bin/launchctl bootout user/$(/usr/bin/id -u `/usr/bin/whoami`)
fi
fi
exit 0
elif [ $1 = "switchon" ]; then
/usr/bin/curl --data "$data1&update_status=$statusSwitchon&sdate=$dt" $uri >/dev/null 2>&1
elif [ $1 = "shutdown" ]; then
/usr/bin/curl --data "$data1&update_status=$statusShutdown&sdate=$dt" $uri >/dev/null 2>&1
elif [ $1 = "servicestop" ]; then
/usr/bin/curl --data "$data1&update_status=$statusServicestop&hdate=$dt" $uri >/dev/null 2>&1
elif [ $1 = "updateURL" ]; then
/usr/bin/curl --data "$data1&update_status=$statusConfirmURL" $uri >/dev/null 2>&1
fi
exit 0
3. Create omamori config file:
sudo vi /Library/labo00/omamori/omamori.config
4. Copy and paste below script into omamori.config copy
#!/bin/bash

#Developed by labo00 LLC, 2019
#Users should read and follow Omamori website official instruction before editing this file
#labo00 LLC bears no responsibility for any damages and loss caused by using this script

#Device identifier, please keep it secret and do not change it
device="45fbaf40-51a1-4acd-bb39-b73ee160cd78"

#User identifier, please keep it secret and do not change it
user="<your_user_id>"

#Reserved field, please keep it secret and do not change it
rescueKey="29a57ba8-fa48-4806-b489-66f106f6472d"

#0: Disable Autolock; 1: Enable Autolock
autolock=1

#0: Disable Autolock when offline; 1: Lock machine when offline
autolockWhenDisconnected=0

#Set if the device is active or not. true/false
isActive=true

#Omamori API path
uri="https://www.labo00.com/omamori/update.php"

#Device type information
deviceType="mac"

#Current script version
version=100

#Device ping response time target, we recommend using Cloudflare "1.1.1.1" or Google "8.8.8.8"
pingTarget="1.1.1.1"
5. Please change the <your_user_id> to your Omamori user ID. If you are setting up more than 1 device, please also check if you had used the device ID twice. You could refresh this page or use command uuidgen to get a new device ID. It is also recommended to have different rescueKey for different machine.
Remark: rescueKey could be used to bypass omamori and unlock the machine in Windows, but this function is still not applicable on Mac.
When autolock is set to 0, the function of disallowing users logging into a locked device will be disabled. If you would like to enable this function, please set to 1.
To enable user bypass checking and login the device when facing internet issue, by default we suggest setting autolockWhenDisconnected to 0. If you set it to 1, you might face the risk of unable to login again.
6. Create script for login event:
sudo vi /Library/labo00/omamori/login.sh
7. Copy and paste below script into login.sh copy
#!/bin/bash

#Developed by labo00 LLC, 2019
#Users should read and follow Omamori website official instruction before editing this file
#labo00 LLC bears no responsibility for any damages and loss caused by using this script

/Library/labo00/omamori/omamori.sh login >/dev/null 2>&1

exit 0
8. Create script for startup and shutdown event:
sudo vi /Library/labo00/omamori/start-stop.sh
9. Copy and paste below script into start-stop.sh copy
#!/bin/bash

#Developed by labo00 LLC, 2019
#Users should read and follow Omamori website official instruction before editing this file
#labo00 LLC bears no responsibility for any damages and loss caused by using this script

. /etc/rc.common

function shutdown()
{
	/Library/labo00/omamori/omamori.sh shutdown >/dev/null 2>&1

	exit 0
}

function startup()
{
	CheckForNetwork

	while [ "${NETWORKUP}" != "-YES-" ]
	do
		sleep 5
		NETWORKUP=
		CheckForNetwork
	done

	/Library/labo00/omamori/omamori.sh switchon >/dev/null 2>&1

	tail -f /dev/null &
	wait $!
}

trap shutdown SIGTERM
trap shutdown SIGKILL

startup;
10. Change the permission of the script files:
		sudo chmod 755 /Library/labo00/omamori/omamori.sh

		sudo chmod 644 /Library/labo00/omamori/omamori.config

		sudo chmod 755 /Library/labo00/omamori/login.sh

		sudo chmod 755 /Library/labo00/omamori/start-stop.sh
11. Setup launch agent for login event
sudo vi /Library/LaunchAgents/com.labo00.omamori.agent.plist
12. Copy and paste below content into com.labo00.omamori.agent.plist copy
<?xml version="1.0" encoding="UTF-8"?>
<!DOCTYPE plist PUBLIC "-//Apple//DTD PLIST 1.0//EN" "http://www.apple.com/DTDs/PropertyList-1.0.dtd">
<plist version="1.0">
  <dict>
    <key>Label</key>
    <string>com.labo00.omamori.agent</string>
    <key>ProgramArguments</key>
    <array>
      <string>/Library/labo00/omamori/login.sh</string>
    </array>
    <key>RunAtLoad</key>
    <true/>
    <key>StandardOutPath</key>
    <string>/dev/null</string>
    <key>StandardErrorPath</key>
    <string>/dev/null</string>
  </dict>
</plist>
13. Setup launch daemon for startup and shutdown event
sudo vi /Library/LaunchDaemons/com.labo00.omamori.daemon.plist
14. Copy and paste below content into com.labo00.omamori.daemon.plist copy
<?xml version="1.0" encoding="UTF-8"?>
<!DOCTYPE plist PUBLIC "-//Apple//DTD PLIST 1.0//EN" "http://www.apple.com/DTDs/PropertyList-1.0.dtd">
<plist version="1.0">
  <dict>
    <key>Label</key>
    <string>com.labo00.omamori.daemon</string>
    <key>ProgramArguments</key>
	<array>
	  <string>/Library/labo00/omamori/start-stop.sh</string>
	</array>
    <key>RunAtLoad</key>
    <true/>
    <key>StandardOutPath</key>
    <string>/dev/null</string>
    <key>StandardErrorPath</key>
    <string>/dev/null</string>
    <key>UserName</key>
    <string>root</string>
  </dict>
</plist>
15. Register the daemons:
		sudo launchctl load -w /Library/LaunchAgents/com.labo00.omamori.agent.plist

		sudo launchctl load -w /Library/LaunchDaemons/com.labo00.omamori.daemon.plist
16. Setup hourly ping status update
sudo crontab -e
Add following cronjob
12 * * * * /Library/labo00/omamori/omamori.sh update >/dev/null 2>&1
The minute executing the cronjob is generated by random script. We recommend you keep the random value unchanged to avoid all users inform us their ping status at the same time.
You might want to do the update more frequently, say every 15min. But we are sorry to inform you that we will ignore all ping status update call less than 1 hour interval.
17. Register your device
sudo /Library/labo00/omamori/omamori.sh register
18. Congratulations, you are done. You can now refresh the portal and see your Mac appeared on the screen.
CAUTION:
Applying below scripts requires certain level of unix/linux knowhow. Please properly backup your Mac before applying any changes. Please justify and use the script at your own risk. labo00 LLC will bear no responsibility for any loss or trouble caused by using the scripts and commands.
Since Omamori login script making use of launch agent will not be triggered in remote login, we provide an alternative for users to setup a cronjob to detect any new active sessions in every 5 minutes. If you had not enabled any remote login feature in your Mac, you can probably skip this section.
1. Create session monitor script:
		sudo touch /Library/labo00/omamori/sessions.cache

		sudo vi /Library/labo00/omamori/session_monitor.sh
2. Copy and paste below script into session_monitor.sh copy
#!/bin/bash
#Developed by labo00 LLC, 2019
#Users should read and follow Omamori website official instruction before editing this file
#labo00 LLC bears no responsibility for any damages and loss caused by using this script
config="/Library/labo00/omamori/omamori.config"
cache="/Library/labo00/omamori/sessions.cache"
. $config
statusLogin="9e13cbfc-bc49-45ec-a7a8-17a2f08887e3"
data1="device=$device&user=$user&type=$deviceType&version=$version"
dt=`date '+%Y-%m-%d %H:%M:%S'`
sessionStr=$(/bin/cat $cache | /usr/bin/tr "\n" " ")
sessionArr=($sessionStr)
sessionStr=""
/usr/bin/last | /usr/bin/grep "logged in" | /usr/bin/perl -nle'print $1," ",$2," ",$3 while m{^(\S+)\s+(\S+)\s+(\S+)}g' | while read line;
do
ary=($line)
if [[ ! ${ary[2]} =~ ^[0-9]+\.[0-9]+\.[0-9]+\.[0-9]+$ ]]; then
continue
fi
value=${ary[0]}@${ary[2]}@${ary[1]}
if [[ ! " ${sessionArr[@]} " =~ " ${value} " ]]; then
if [ "$isActive" = false ]; then
sessionStr="${sessionStr}\n$value"
continue
fi
if ! /sbin/ping -c 1 $pingTarget &> /dev/null
then
sessionStr="${sessionStr}\n$value"
continue
fi
luser=${ary[0]}
ltype="mac"
lip=${ary[2]}
lcountry=$(/usr/bin/curl -sS --max-time 5 https://ip2c.org/?ip=$lip | /usr/bin/cut -d';' -f3)
if [ "$lcountry" = "ZZZ" ]; then
lcountry="LOC"
fi
laction="N"
if [ $autolock -eq 1 ]; then
laction="A"
fi
aFlag=$(/usr/bin/curl --data "$data1&update_status=$statusLogin&ldate=$dt&lip=$lip&lcountry=$lcountry&luser=$luser<ype=$ltype&laction=$laction" $uri | /usr/bin/grep -o -E '\"actionFlag\":\-?[0-9]+' | /usr/bin/awk -F\: '{print $2}')
if [[ ( $aFlag -eq 1 ) ]]; then
if [[ ( $autolock -eq 1 ) ]]; then
pid=$(/bin/ps aux | /usr/bin/grep [@]${ary[1]} | /usr/bin/perl -nle'print $1 if m{^\S+\s+(\d+)}')
kill -9 $pid
else
sessionStr="${sessionStr}\n$value"
fi
else
sessionStr="${sessionStr}\n$value"
fi
fi
done
echo $sessionStr > $cache
exit 0
3. Change the permission of the files:
		sudo chmod 644 /Library/labo00/omamori/sessions.cache

		sudo chmod 755 /Library/labo00/omamori/session_monitor.sh
4. Setup session monitoring cronjob
sudo crontab -e
Add following cronjob
*/5 * * * * /Library/labo00/omamori/session_monitor.sh >/dev/null 2>&1
5. You are done. That is all for setting up the session monitoing service.
For Macs subscribed premium service, users could add custom actions to their Macs.
Below we will try to setup a trap command to track for hacker activities as an example to demonstrate how to add a custom action. This action will be triggered when a user executes certain command to spot system compromise.
Remark: This example is made based on macOS Mojave. You might need to do certain modification before it works in your device.
1. Add a new action in Omamori portal, named it "Trap Command Initiated", set the action string to "Trap Command Initiated. $user@$dt". You will see this message when this action is triggered.

2. Save the action and copy the Action UUID for later use.

3. Create a omamori_trap.sh script to trigger the trap command
sudo vi /Library/labo00/omamori/omamori_trap.sh
Copy and paste below script into omamori_trap.sh copy
#!/bin/bash
#Developed by labo00 LLC, 2019
#Omamori Trap command demonstration
#Users should read and follow Omamori website official instruction before editing this file
#labo00 LLC bears no responsibility for any damages or loss caused by using this script
config="/Library/labo00/omamori/omamori.config"
. $config
if [[ ( "$isActive" = false ) ]]; then
exit 0
fi
#Trap Command Initiated, correspond to Action UUID in omamori portal
actionTrap="8aec50ed-d627-4a05-b40a-0225c582de93"
data1="device=$device&user=$user&type=$deviceType&version=$version"
dt=`date '+%Y-%m-%d %H:%M:%S'`
user=`/usr/bin/whoami`
#Check Internet Connectivity
if ! /sbin/ping -c 1 $pingTarget &> /dev/null
then
if [[ ( $autolockWhenDisconnected -eq 1 && $user != "root" ) ]]; then
/bin/launchctl bootout user/$(/usr/bin/id -u $user)
exit 0
fi
fi
laction="N"
if [ $autolock -eq 1 ]; then
laction="A"
fi
#Get username and call omamori API with Trap Command Action UUID
luser=$(/usr/bin/whoami | /usr/bin/sed 's/&/\&/g; s/</\</g; s/>/\>/g; s/"/\"/g; s/'"'"'/\'/g')
aFlag=$(/usr/bin/curl --data "$data1&update_status=$actionTrap&luser=$luser&laction=$laction" $uri | /usr/bin/grep -o -E '\"actionFlag\":\-?[0-9]+' | /usr/bin/awk -F\: '{print $2}')
if [[ ( $aFlag -eq 1 || $aFlag -eq 3 || $aFlag -eq 5 || $aFlag -eq 7 ) ]]; then
if [[ ( $autolock -eq 1 && $user != "root" ) ]]; then
/bin/launchctl bootout user/$(/usr/bin/id -u $user)
fi
fi
exit 0
Change the permission of the script file
sudo chmod 755 /Library/labo00/omamori/omamori_trap.sh
4. Setup situation to trigger the trap command. In this case we would make use of command alias. Open .bashrc
vi /etc/bashrc
5. Add alias for hackers commonly used commands, e.g. whoami, ifconfig, uname, etc. Below is the example of manupulating whoami command:
alias whoami='/Library/labo00/omamori/omamori_trap.sh >/dev/null 2>&1|/usr/bin/whoami'
6. You can then enable phone and email notification of "Trap Command Initiated" action on your Mac, and try to execute whoami after restarting the session (the change takes effect from next login) to see the results.
Below are issues we discovered so far on Omamori Mac script. Please report to us by sending email to inquiry@labo00.com if you encountered any new problem.
1. Login script can only detect console login. If you would also like to detect remote login, we provide a 5 minute cronjob solution which will detect any new active session in every 5 minutes and perform login notification and user logout. For details please refer to Session Monitor section.
2. Unlocking Mac will not trigger login event. You can use SleepWatcher alongside with Omamori login script to accomplish your goal.
3. Very oftenly users will not be able to get a device offline signal. It is believed before sending out the signal, Mac network interface had already been turned off causing the issue.
Can not find your distribution? You can:
1. Select the distrubution most similar to your system and do appropriate modification in script
2. Drop a mail to inquiry@labo00.com. We can not guarantee but we might include your suggestion in future.
1. Create omamori script:
		sudo mkdir /opt/omamori/

		sudo chmod 755 /opt/omamori/

		sudo vi /opt/omamori/omamori.sh
2. Copy and paste below script into omamori.sh copy
#!/bin/bash
#Developed by labo00 LLC, 2019
#Users should read and follow Omamori website official instruction before editing this file
#labo00 LLC bears no responsibility for any damages or loss caused by using this script
config="/opt/omamori/omamori.config"
. $config
if [[ ( "$isActive" = false && $1 != "register" ) ]]; then
exit 0
fi
statusUpdate="9b141dd5-7f5e-4ea8-8d8d-18a0be6a3414"
statusLogin="9e13cbfc-bc49-45ec-a7a8-17a2f08887e3"
statusSwitchon="207686ee-3bb7-4ea9-a8b5-bceffd3b7745"
statusShutdown="f7a6fc86-f567-43a2-a883-a9de16e9f6a6"
statusServicestop="ef22ffea-243e-4717-992d-ec3903f192d7"
statusConfirmURL="9ec87f22-042b-42fd-bcaa-d675ffd20e9c"
data1="device=$device&user=$user&type=$deviceType&version=$version"
dt=`date '+%Y-%m-%d %H:%M:%S'`
#Check Internet Connectivity
if ! /bin/ping -c 1 $pingTarget &> /dev/null
then
exit $autolockWhenDisconnected
fi
if [[ ( $# -eq 0 || $1 = "update" || $1 = "register" ) ]]; then
pRes=$(/bin/ping -qc4 $pingTarget 2>&1)
data2=$(/bin/echo $pRes | /bin/grep -oP '\d+(?= received)')
data3=$(/bin/echo ${pRes//\//;} | /bin/grep -oP '\d+\.\d+;\d+\.\d+;\d+\.\d+')
data4=""
if [ $1 = "register" ]; then
data4="&rescue_key=$rescueKey"
fi
res=$(/usr/bin/curl --data "$data1&update_status=$statusUpdate&ping=$data2;$data3$data4" $uri)
msg=$(/bin/echo $res | /bin/grep -o -E '\"msg\":\"device [a-z]+\"' | /usr/bin/awk -F\: '{print $2}')
expired=$(/bin/echo $res | /bin/grep -o -E '\"expired\":\"[YN]\"' | /usr/bin/awk -F\: '{print $2}')
deleted=$(/bin/echo $res | /bin/grep -o -E '\"deleted\":\"[YN]\"' | /usr/bin/awk -F\: '{print $2}')
active=$(/bin/echo $res | /bin/grep -o -E '\"active\":\"[YN]\"' | /usr/bin/awk -F\: '{print $2}')
if [[ ( $msg = '"device expired"' || $msg = '"device deleted"' || $msg = '"device inactivated"' ) ]]; then
/bin/sed -i 's/isActive=true/isActive=false/g' $config >/dev/null 2>&1
elif [[ ( $1 = "register" && $expired = '"N"' && $deleted = '"N"' && $active = '"Y"' ) ]]; then
/bin/sed -i 's/isActive=false/isActive=true/g' $config >/dev/null 2>&1
fi
elif [ $1 = "login" ]; then
luser=$(/bin/echo "$PAM_USER" | /bin/sed 's/&/\&/g; s/</\</g; s/>/\>/g; s/"/\"/g; s/'"'"'/\'/g')
lip="$PAM_RHOST"
lptype="$PAM_TYPE"
laction="N"
if [ "$lptype" = "close_session" ]; then
exit 0
fi
if [ "$lip" = "" ]; then
lip="0.0.0.0"
fi
lcountry=$(/usr/bin/curl -sS --max-time 5 https://ip2c.org/?ip=$lip | /usr/bin/cut -d';' -f3)
if [ "$lcountry" = "ZZZ" ]; then
lcountry="LOC"
fi
ltype="ssh"
if [[ ( $# -eq 2 && $2 = "tty" ) ]]; then
ltype="tty"
elif [[ ( $# -eq 2 && $2 = "cockpit" ) ]]; then
ltype="cockpit"
fi
if [ $autolock -eq 1 ]; then
laction="A"
fi
aFlag=$(/usr/bin/curl --data "$data1&update_status=$statusLogin&ldate=$dt&lip=$lip&lcountry=$lcountry&luser=$luser<ype=$ltype&laction=$laction" $uri | /bin/grep -o -E '\"actionFlag\":\-?[0-9]+' | /usr/bin/awk -F\: '{print $2}')
if [[ ( $aFlag -eq 1 ) ]]; then
exit $autolock
fi
elif [ $1 = "switchon" ]; then
/usr/bin/curl --data "$data1&update_status=$statusSwitchon&sdate=$dt" $uri >/dev/null 2>&1
elif [ $1 = "shutdown" ]; then
/usr/bin/curl --data "$data1&update_status=$statusShutdown&sdate=$dt" $uri >/dev/null 2>&1
elif [ $1 = "servicestop" ]; then
/usr/bin/curl --data "$data1&update_status=$statusServicestop&hdate=$dt" $uri >/dev/null 2>&1
elif [ $1 = "updateURL" ]; then
/usr/bin/curl --data "$data1&update_status=$statusConfirmURL" $uri >/dev/null 2>&1
fi
exit 0
3. Create omamori config file:
sudo vi /opt/omamori/omamori.config
4. Copy and paste below script into omamori.config copy
#!/bin/bash

#Developed by labo00 LLC, 2019
#Users should read and follow Omamori website official instruction before editing this file
#labo00 LLC bears no responsibility for any damages and loss caused by using this script

#Device identifier, please keep it secret and do not change it
device="3569cdac-5ce1-4be3-8bc7-72d6db5211e3"

#User identifier, please keep it secret and do not change it
user="<your_user_id>"

#Reserved field, please keep it secret and do not change it
rescueKey="cac08293-9a6c-401d-8ee4-71781383db59"

#0: Disable Autolock; 1: Enable Autolock
autolock=1

#0: Disable Autolock when offline; 1: Lock machine when offline
autolockWhenDisconnected=0

#Set if the device is active or not. true/false
isActive=true

#Omamori API path
uri="https://www.labo00.com/omamori/update.php"

#Device type information
deviceType="nix"

#Current script version
version=100

#Device ping response time target, we recommend using Cloudflare "1.1.1.1" or Google "8.8.8.8"
pingTarget="1.1.1.1"
5. Please change the <your_user_id> to your Omamori user ID. If you are setting up more than 1 device, please also check if you had used the device ID twice. You could refresh this page or use linux command uuidgen to get a new device ID. It is also recommended to have different rescueKey for different linux machine.
Remark: rescueKey could be used to bypass omamori and unlock the machine in Windows, but this function is still not applicable on linux.
When autolock is set to 0, the function of disallowing users logging into a locked device will be disabled. If you would like to enable this function, please set to 1.
To enable user bypass checking and login the device when facing internet issue, by default we suggest setting autolockWhenDisconnected to 0. If you set it to 1, you might face the risk of unable to login again.
6. Change the permission of the script files:
		sudo chmod 755 /opt/omamori/omamori.sh

		sudo chmod 644 /opt/omamori/omamori.config
7. Setup ssh login notification and locking
sudo vi /etc/pam.d/sshd
Append the follow lines at end of file
		#omamori service

		session required pam_exec.so seteuid /opt/omamori/omamori.sh login ssh
If you do not want autolock function enabled on ssh login, you can change the required parameter into optional.
8. Setup tty login notification and locking
sudo vi /etc/pam.d/login
Append the follow lines at end of file
		#omamori service

		session required pam_exec.so seteuid /opt/omamori/omamori.sh login tty
If you do not want autolock function enabled on tty login, you can change the required parameter into optional.
9. For system using cockpit like Fedora 30, please check if /etc/pam.d/cockpit exists or not, setup cockpit login notification and locking
sudo vi /etc/pam.d/cockpit
Append the follow lines at end of file
		#omamori service

		session required pam_exec.so seteuid /opt/omamori/omamori.sh login cockpit
If you do not want autolock function enabled on tty login, you can change the required parameter into optional.
10. Setup hourly ping status update
sudo crontab -e
Add following cronjob
23 * * * * /opt/omamori/omamori.sh >/dev/null 2>&1
The minute executing the cronjob is generated by random script. We recommend you keep the random value unchanged to avoid all users inform us their ping status at the same time.
You might want to do the update more frequently, say every 15min. But we are sorry to inform you that we will ignore all ping status update call less than 1 hour interval.
11. Setup switchon and shutdown notification
sudo vi /etc/systemd/system/omamori_on_off.service
12. Copy and paste below script into omamori_on_off.service copy
[Unit]
Description=Omamori Service (Startup and Shutdown)
Wants=network-online.target
After=network-online.target

[Service]
Type=oneshot
ExecStart=/opt/omamori/omamori.sh switchon >/dev/null 2>&1
ExecStop=/opt/omamori/omamori.sh shutdown >/dev/null 2>&1
RemainAfterExit=yes

[Install]
WantedBy=multi-user.target
13. Setup omamori_on_off.service permission and enable its service
		sudo chmod 644 /etc/systemd/system/omamori_on_off.service


		sudo systemctl enable omamori_on_off

		sudo systemctl start omamori_on_off
14. Register your device
sudo /opt/omamori/omamori.sh register
15. Congratulations, you are done. You can now refresh the portal and see your ubuntu appeared on the screen.
1. Create omamori script:
		sudo mkdir /opt/omamori/

		sudo chmod 755 /opt/omamori/

		sudo vi /opt/omamori/omamori.sh
2. Copy and paste below script into omamori.sh copy
#!/bin/bash
#Developed by labo00 LLC, 2019
#Users should read and follow Omamori website official instruction before editing this file
#labo00 LLC bears no responsibility for any damages or loss caused by using this script
config="/opt/omamori/omamori.config"
. $config
if [[ ( "$isActive" = false && $1 != "register" ) ]]; then
exit 0
fi
statusUpdate="9b141dd5-7f5e-4ea8-8d8d-18a0be6a3414"
statusLogin="9e13cbfc-bc49-45ec-a7a8-17a2f08887e3"
statusSwitchon="207686ee-3bb7-4ea9-a8b5-bceffd3b7745"
statusShutdown="f7a6fc86-f567-43a2-a883-a9de16e9f6a6"
statusServicestop="ef22ffea-243e-4717-992d-ec3903f192d7"
statusConfirmURL="9ec87f22-042b-42fd-bcaa-d675ffd20e9c"
data1="device=$device&user=$user&type=$deviceType&version=$version"
dt=`date '+%Y-%m-%d %H:%M:%S'`
#Check Internet Connectivity
if ! /bin/ping -c 1 $pingTarget &> /dev/null
then
exit $autolockWhenDisconnected
fi
if [[ ( $# -eq 0 || $1 = "update" || $1 = "register" ) ]]; then
pRes=$(/bin/ping -qc4 $pingTarget 2>&1)
data2=$(/bin/echo $pRes | /bin/grep -oP '\d+(?= received)')
data3=$(/bin/echo ${pRes//\//;} | /bin/grep -oP '\d+\.\d+;\d+\.\d+;\d+\.\d+')
data4=""
if [ $1 = "register" ]; then
data4="&rescue_key=$rescueKey"
fi
res=$(/usr/bin/curl --data "$data1&update_status=$statusUpdate&ping=$data2;$data3$data4" $uri)
msg=$(/bin/echo $res | /bin/grep -o -E '\"msg\":\"device [a-z]+\"' | /usr/bin/awk -F\: '{print $2}')
expired=$(/bin/echo $res | /bin/grep -o -E '\"expired\":\"[YN]\"' | /usr/bin/awk -F\: '{print $2}')
deleted=$(/bin/echo $res | /bin/grep -o -E '\"deleted\":\"[YN]\"' | /usr/bin/awk -F\: '{print $2}')
active=$(/bin/echo $res | /bin/grep -o -E '\"active\":\"[YN]\"' | /usr/bin/awk -F\: '{print $2}')
if [[ ( $msg = '"device expired"' || $msg = '"device deleted"' || $msg = '"device inactivated"' ) ]]; then
/bin/sed -i 's/isActive=true/isActive=false/g' $config >/dev/null 2>&1
elif [[ ( $1 = "register" && $expired = '"N"' && $deleted = '"N"' && $active = '"Y"' ) ]]; then
/bin/sed -i 's/isActive=false/isActive=true/g' $config >/dev/null 2>&1
fi
elif [ $1 = "login" ]; then
luser=$(/bin/echo "$PAM_USER" | /bin/sed 's/&/\&/g; s/</\</g; s/>/\>/g; s/"/\"/g; s/'"'"'/\'/g')
lip="$PAM_RHOST"
lptype="$PAM_TYPE"
laction="N"
if [ "$lptype" = "close_session" ]; then
exit 0
fi
if [ "$lip" = "" ]; then
lip="0.0.0.0"
fi
lcountry=$(/usr/bin/curl -sS --max-time 5 https://ip2c.org/?ip=$lip | /usr/bin/cut -d';' -f3)
if [ "$lcountry" = "ZZZ" ]; then
lcountry="LOC"
fi
ltype="ssh"
if [[ ( $# -eq 2 && $2 = "tty" ) ]]; then
ltype="tty"
fi
if [ $autolock -eq 1 ]; then
laction="A"
fi
aFlag=$(/usr/bin/curl --data "$data1&update_status=$statusLogin&ldate=$dt&lip=$lip&lcountry=$lcountry&luser=$luser<ype=$ltype&laction=$laction" $uri | /bin/grep -o -E '\"actionFlag\":\-?[0-9]+' | /usr/bin/awk -F\: '{print $2}')
if [[ ( $aFlag -eq 1 ) ]]; then
exit $autolock
fi
elif [ $1 = "switchon" ]; then
/usr/bin/curl --data "$data1&update_status=$statusSwitchon&sdate=$dt" $uri >/dev/null 2>&1
elif [ $1 = "shutdown" ]; then
/usr/bin/curl --data "$data1&update_status=$statusShutdown&sdate=$dt" $uri >/dev/null 2>&1
elif [ $1 = "servicestop" ]; then
/usr/bin/curl --data "$data1&update_status=$statusServicestop&hdate=$dt" $uri >/dev/null 2>&1
elif [ $1 = "updateURL" ]; then
/usr/bin/curl --data "$data1&update_status=$statusConfirmURL" $uri >/dev/null 2>&1
fi
exit 0
3. Create omamori config file:
sudo vi /opt/omamori/omamori.config
4. Copy and paste below script into omamori.config copy
#!/bin/bash

#Developed by labo00 LLC, 2019
#Users should read and follow Omamori website official instruction before editing this file
#labo00 LLC bears no responsibility for any damages and loss caused by using this script

#Device identifier, please keep it secret and do not change it
device="57a17ef5-b048-45c2-b5d6-292fda61469b"

#User identifier, please keep it secret and do not change it
user="<your_user_id>"

#Reserved field, please keep it secret and do not change it
rescueKey="3d811a3f-c6ee-4634-afc9-e6547fdf34f2"

#0: Disable Autolock; 1: Enable Autolock
autolock=1

#0: Disable Autolock when offline; 1: Lock machine when offline
autolockWhenDisconnected=0

#Set if the device is active or not. true/false
isActive=true

#Omamori API path
uri="https://www.labo00.com/omamori/update.php"

#Device type information
deviceType="nix"

#Current script version
version=100

#Device ping response time target, we recommend using Cloudflare "1.1.1.1" or Google "8.8.8.8"
pingTarget="1.1.1.1"
5. Please change the <your_user_id> to your user ID. If you are setting up more than 1 device, please also check if you had used the device ID twice. You could refresh this page or use linux command uuidgen to get a new device ID. It is also recommended to have different rescueKey for different linux machine.
Remark: rescueKey could be used to bypass omamori and unlock the machine in Windows, but this function is still not applicable on linux.
When autolock is set to 0, the function of disallowing users logging into a locked device will be disabled. If you would like to enable this function, please set to 1.
To enable user bypass checking and login the device when facing internet issue, by default we suggest setting autolockWhenDisconnected to 0. If you set it to 1, you might face the risk of unable to login again.
6. Change the permission of the script files:
		sudo chmod 755 /opt/omamori/omamori.sh

		sudo chmod 644 /opt/omamori/omamori.config
7. Setup ssh login notification and locking
sudo vi /etc/pam.d/sshd
Append the follow lines at end of file
		#omamori service

		session required pam_exec.so seteuid /opt/omamori/omamori.sh login ssh
If you do not want autolock function enabled on ssh login, you can change the required parameter into optional.
8. Setup tty login notification and locking
sudo vi /etc/pam.d/login
Append the follow lines at end of file
		#omamori service

		session required pam_exec.so seteuid /opt/omamori/omamori.sh login tty
If you do not want autolock function enabled on tty login, you can change the required parameter into optional.
9. Setup hourly ping status update
sudo crontab -e
Add following cronjob
46 * * * * /opt/omamori/omamori.sh >/dev/null 2>&1
The minute executing the cronjob is generated by random script. We recommend you keep the random value unchanged to avoid all users inform us their ping status at the same time.
You might want to do the update more frequently, say every 15min. But we are sorry to inform you that we will ignore all ping status update call less than 1 hour interval.
10. Setup switchon notification
sudo vi /etc/rc.local
Append the follow lines at end of file, before the line of "exit 0"
		#omamori service

		/opt/omamori/omamori.sh switchon >/dev/null 2>&1
11. Setup shutdown notification
sudo vi /etc/init.d/omamori_shutdown.sh
Copy the content below into the file and save
		#!/bin/bash


		/opt/omamori/omamori.sh shutdown >/dev/null 2>&1
Change the permission of the script file:
sudo chmod 755 /etc/init.d/omamori_shutdown.sh
Setup symlink in rc0.d and rc6.d
		sudo ln -s /etc/init.d/omamori_shutdown.sh /etc/rc0.d/S00omamori-shutdown

		sudo ln -s /etc/init.d/omamori_shutdown.sh /etc/rc6.d/S00omamori-shutdown
12. Register your device
sudo /opt/omamori/omamori.sh register
13. Congratulations, you are done. You can now refresh the portal and see your ubuntu appeared on the screen.
For linux devices subscribed premium service, users could add custom actions to their linux devices.
Below we will try to setup a trap command to track for hacker activities as an example to demonstrate how to add a custom action. This action will be triggered when a user executes certain command to spot system compromise.
Remark: This example is made based on ubuntu 18.04 environment. You might need to do certain modification before it works in your device.
1. Add a new action in Omamori portal, named it "Trap Command Initiated", set the action string to "Trap Command Initiated. $user@$dt". You will see this message when this action is triggered.
2. Save the action and copy the Action UUID for later use.
3. Create a omamori_trap.sh script to trigger the trap command
sudo vi /opt/omamori/omamori_trap.sh
Copy and paste below script into omamori_trap.sh copy
#!/bin/bash
#Developed by labo00 LLC, 2019
#Omamori Trap command demonstration
#Users should read and follow Omamori website official instruction before editing this file
#labo00 LLC bears no responsibility for any damages or loss caused by using this script
config="/opt/omamori/omamori.config"
. $config
if [[ ( "$isActive" = false ) ]]; then
exit 0
fi
#Trap Command Initiated, correspond to Action UUID in omamori portal
actionTrap="8aec50ed-d627-4a05-b40a-0225c582de93"
data1="device=$device&user=$user&type=$deviceType&version=$version"
dt=`date '+%Y-%m-%d %H:%M:%S'`
user=`/usr/bin/whoami`
#Check Internet Connectivity
if ! /bin/ping -c 1 $pingTarget &> /dev/null
then
if [[ ( $autolockWhenDisconnected -eq 1 && $user != "root" ) ]]; then
/usr/bin/pkill -9 -u $user
fi
fi
laction="N"
if [ $autolock -eq 1 ]; then
laction="A"
fi
#Get username and call omamori API with Trap Command Action UUID
luser=$(/usr/bin/whoami | /bin/sed 's/&/\&/g; s/</\</g; s/>/\>/g; s/"/\"/g; s/'"'"'/\'/g')
aFlag=$(/usr/bin/curl --data "$data1&update_status=$actionTrap&luser=$luser&laction=$laction" $uri | /bin/grep -o -E '\"actionFlag\":\-?[0-9]+' | /usr/bin/awk -F\: '{print $2}')
if [[ ( $aFlag -eq 1 || $aFlag -eq 3 || $aFlag -eq 5 || $aFlag -eq 7 ) ]]; then
if [[ ( $autolock -eq 1 && $user != "root" ) ]]; then
/usr/bin/pkill -9 -u $user
fi
fi
exit 0
Change the permission of the script file
sudo chmod 755 /opt/omamori/omamori_trap.sh
4. Setup situation to trigger the trap command. In this case we would make use of command alias. Open .bashrc
vi ~/.bashrc
5. Add alias for hackers commonly used commands, e.g. whoami, ifconfig, uname, etc. Below is the example of manupulating whoami command:
alias whoami='/opt/omamori/omamori_trap.sh >/dev/null 2>&1|/usr/bin/whoami'
6. You can then enable phone and email notification of "Trap Command Initiated" action on your linux machine, and try to execute whoami after restarting the session (the change takes effect from next login) to see the results. Please be reminded that .bashrc is user independent, you should repeat step 4 and 5 for different users on your linux device to complete the setup.
Omamori supports both GET and POST API calls. We recommend calling omamori API with POST to have better security.
Standard Omamori API is supposed to be called with the program and scripts we provided, but calling and using them is not restricted.
API URL https://www.labo00.com/omamori/update.php
| Parameter | Value (String) | Description |
| Login | ||
| device | <Device UUID> | Unique Identifier for the device. In UUID format. |
| user | <User ID> | Unique Identifier for user. A 32 character string. |
| type | win/mac/nix/oth | Device Type |
| version | 100 | Agent version, 3 digit integer |
| update_status | 9e13cbfc-bc49-45ec-a7a8-17a2f08887e3 | Login Action ID |
| ldate | 2019-12-31 23:59:59 | Login Date |
| lip | 1.1.1.1 | Login IP |
| lcountry | USA | 3 Digit country code, in capital letter |
| luser | root | Login user |
| ltype | ssh/tty/rdp | Login type |
| laction | Y/N/A | Y indicates login succeed, N indicates login failed, A means depending on server autolock status. It decides notification message. |
| Update Ping Status | ||
| device | <Device UUID> | |
| user | <User ID> | |
| type | win/mac/nix/oth | Device Type |
| version | 100 | Agent version, 3 digit integer |
| update_status | 9b141dd5-7f5e-4ea8-8d8d-18a0be6a3414 | Update Action ID |
| ping | 4;111;222;333 | Ping status, in format <number of received ping (max is 4)>;<min ping (ms)>;<acg ping (ms)>;<max ping (ms)> |
| Switch On | ||
| device | <Device UUID> | |
| user | <User ID> | |
| type | win/mac/nix/oth | Device Type |
| version | 100 | Agent version, 3 digit integer |
| update_status | 207686ee-3bb7-4ea9-a8b5-bceffd3b7745 | Switchon Action ID |
| sdate | 2019-12-31 23:59:59 | Switch on Date |
| Shutdown | ||
| device | <Device UUID> | |
| user | <User ID> | |
| type | win/mac/nix/oth | Device Type |
| version | 100 | Agent version, 3 digit integer |
| update_status | f7a6fc86-f567-43a2-a883-a9de16e9f6a6 | Shutdown Action ID |
| sdate | 2019-12-31 23:59:59 | Shutdown Date |
| Service Stop | ||
| device | <Device UUID> | |
| user | <User ID> | |
| type | win/mac/nix/oth | Device Type |
| version | 100 | Agent version, 3 digit integer |
| update_status | ef22ffea-243e-4717-992d-ec3903f192d7 | Service Stop Action ID |
| hdate | 2019-12-31 23:59:59 | Service Stop Date |
| API Return Result (in JSON format) | ||
| Parameter | Value | Description |
| API Call Success | ||
| result | success | API call success |
| actionFlag | 1/0 | Return 1 if autolock flag is enabled, return 0 if disabled |
| expired | Y/N | Indicates if the device subscription had expired |
| deleted | Y/N | Indicates if the device is deleted |
| active | Y/N | Indicates if the device is enabled |
| API Call Fail | ||
| result | fail | API call fail |
| msg | <string> | Error description |
| err | 2XXX | A 4 digit error code, used for omamori support problem tackling |
Omamori supports both GET and POST API calls. We recommend calling omamori API with POST to have better security. Custom Actions could be used on devices subscribed premium service.
API URL https://www.labo00.com/omamori/update.php
| Parameter | Value (string) | Description |
| Custom Action | ||
| device | <Device UUID> | Unique Identifier for the device. In UUID format. |
| user | <User ID> | Unique Identifier for user. A 32 character string. |
| type | win/mac/nix/oth | Device Type |
| version | 100 | Agent version, 3 digit integer |
| update_status | <Action UUID> | Custom Action UUID |
| lip | 1.1.1.1 | Action IP (Optional) Will be used as $ip field set in action string |
| luser | root | Action user (Optional) Will be used as $user field set in action string |
| laction | Y/N/A | Y indicates login succeed, N indicates login failed, A means depending on server autolock status. It decides notification message. (Optional) |
| API Return Result (in JSON format) | ||
| Parameter | Value | Description |
| API Call Success | ||
| result | success | API call success |
| actionFlag | 7 | 1 digit integer corresponding to enabled services. Using linux rwx convention: phone notification (4), mail notification (2) and autolock (1). |
| expired | Y/N | Indicates if the device subscription had expired |
| deleted | Y/N | Indicates if the device is deleted |
| active | Y/N | Indicates if the device is enabled |
| API Call Fail | ||
| result | fail | API call fail |
| msg | <string> | Error description |
| err | 2XXX | A 4 digit error code, used for omamori support problem tackling |
Omamori supports both GET and POST API calls. We recommend calling omamori API with POST to have better security. Please call the API from backend to hide Deivce UUID and User ID from abusing by malicious users.
Below is sample code for retreiving autolock flag of a device using node.js. copy
//This function will get autolock status stored in omamori portal to let a node.js program decides whether allowing a user to login or not.
//labo00 LLC bears no responsibility for any damages or loss caused by using this script, please use at your own risk.
function allowLogin() {
	const qs = require('querystring');
	const https = require('https');

	var data = qs.stringify({
		'device': '<your_device_id>',
		'user': '<your_user_id>',
		'type': 'nix', //Your device type
		'version': '100', //Your program version
		'update_status': '<your_action_uuid>',
		'lip': '192.168.1.2', //The IP you would like to shown in $ip field in Action String
		'luser': 'testuser', //The user you would like to shown in $user field in Action String
		'laction': 'A' //'Y' indicates showing "action string" message. 'N' showing "action string when lock" message. 'A' shows message depending on autolock status set in omamori portal.
	});

	const options = {
		hostname: 'www.labo00.com',
		port: 443,
		path: '/omamori/update.php',
		method: 'POST',
		headers: {
			'Content-Type': 'application/x-www-form-urlencoded',
			'Content-Length': Buffer.byteLength(data)
		}
	};

	const req = https.request(options, (res) => {
		res.setEncoding('utf8');
		res.on('data', (d) => {
			var json = qs.parse(d);

			if(json.result=="success") {
				var flag = parseInt(json.actionFlag);

				if(flag>=4) {
					//Phone notification is on
					flag -= 4;
				}
				if(flag>=2) {
					//Email notification is on
					flag -= 2;
				}
				if(flag>=1) {
					//Autolock is on
					//Kick user out
				} else {
					//Autolock is off
					//Allow user login
				}
			} else if(json.result=="fail") {
				/* Handle error */
				//console.error(json.msg);
			}
		});
	});

	req.on('error', (e) => {
		/* Handle error */
		console.error(e);
	});
	req.write(data);
	req.end();
}
Omamori supports both GET and POST API calls. We recommend calling omamori API with POST to have better security. Please call the API from backend to hide Deivce UUID and User ID from abusing by malicious users.
Below is sample code for retreiving autolock flag of a device using php. copy
//This function will get autolock status stored in omamori portal to let a php program, e.g. forum, decides whether allowing a user to login or not.
//labo00 LLC bears no responsibility for any damages or loss caused by using this script, please use at your own risk.
function allowLogin() {
	$url = 'https://www.labo00.com/omamori/update.php';

	$data = array();
	$data['device'] = '<your_device_id>';
	$data['user'] = '<your_user_id>';
	$data['type'] = 'nix'; //Your device type
	$data['version'] = '100'; //Your program version
	$data['update_status'] = '<your_action_uuid>';
	$data['lip'] = '192.168.1.2'; //The IP you would like to shown in $ip field in Action String
	$data['luser'] = 'testuser'; //The user you would like to shown in $user field in Action String
	$data['laction'] = 'A'; //'Y' indicates showing "action string" message. 'N' showing "action string when lock" message. 'A' shows message depending on autolock status set in omamori portal.

	$options = array(
		'http' => array(
			'header'  => "Content-type: application/x-www-form-urlencoded\r\n",
			'method'  => 'POST',
			'content' => http_build_query($data)
		)
	);
	$context  = stream_context_create($options);
	$result = file_get_contents($url, false, $context);
	if($result === FALSE) { /* Handle error */ }

	$json = json_decode($result);
	if($json->result==="success") {
		$flag = $json->actionFlag;

		if($flag>=4) {
			//Phone notification is on
			$flag -= 4;
		}
		if($flag>=2) {
			//Email notification is on
			$flag -= 2;
		}
		if($flag>=1) {
			//Autolock is on
			return false;
		} else {
			//Autolock is off
			return true;
		}
	} else if($json->result==="fail") {
		/* Handle error */
		//echo $json->msg;

		return false;
	}
	return false;
}
Omamori supports both GET and POST API calls. We recommend calling omamori API with POST to have better security. Please call the API from backend to hide Deivce UUID and User ID from abusing by malicious users.
Below is sample code for retreiving autolock flag of a device using C#.Net. copy
//It is recommended to instantiate one HttpClient for your application's lifetime and share it.
private static readonly HttpClient client = new HttpClient();

//This function will get autolock status stored in omamori portal to let a C#.Net program, e.g. forum, decides whether allowing a user to login or not.
//labo00 LLC bears no responsibility for any damages or loss caused by using this script, please use at your own risk.
private static bool allowLogin() {
	var data = new Dictionary<string, string>
	{
		{ "device", "<your_device_id>" },
		{ "user", "<your_user_id>" },
		{ "type", "nix" }, //Your device type
		{ "version", "100" }, //Your program version
		{ "update_status", "<your_action_uuid>" },
		{ "lip", "192.168.1.2" }, //The IP you would like to shown in $ip field in Action String
		{ "luser", "testuser" }, //The user you would like to shown in $user field in Action String
		{ "laction", "A" } //'Y' indicates showing "action string" message. 'N' showing "action string when lock" message. 'A' shows message depending on autolock status set in omamori portal.
	};

	var content = new FormUrlEncodedContent(data);

	var response = await client.PostAsync("https://www.labo00.com/omamori/update.php", content);

	var jsonStr = await response.Content.ReadAsStringAsync();

	Dictionary<string, string> dict = new JavaScriptSerializer().Deserialize<Dictionary<string, string>>(jsonStr);
	JsonResponse json = new JsonResponse(dict);

	if (json.result!=null && json.result.Equals("success"))
	{
		int flag = Int32.Parse(json.actionFlag);

		if(flag>=4) {
			//Phone notification is on
			flag -= 4;
		}
		if(flag>=2) {
			//Email notification is on
			flag -= 2;
		}
		if(flag>=1) {
			//Autolock is on
			return false;
		} else {
			//Autolock is off
			return true;
		}
	}
	else if (json.result != null && json.result.Equals("fail"))
	{
		/* Handle error */
		//Console.WriteLine(json.msg);

		return false;
	}
	return false;
}
Omamori supports both GET and POST API calls. We recommend calling omamori API with POST to have better security. Please call the API from backend to hide Deivce UUID and User ID from abusing by malicious users.
Below is sample code for retreiving autolock flag of a device using Java. copy
//This function will get autolock status stored in omamori portal to let a Java program, decides whether allowing a user to login or not.
//labo00 LLC bears no responsibility for any damages or loss caused by using this script, please use at your own risk.
private static boolean allowLogin() {
	boolean rtnFlag = false;

	HttpClient httpclient = HttpClients.createDefault();
	HttpPost httppost = new HttpPost("https://www.labo00.com/omamori/update.php");

	List<NameValuePair> data = new ArrayList<NameValuePair>(2);
	data.add(new BasicNameValuePair("device", "<your_device_id>"));
	data.add(new BasicNameValuePair("user", "<your_user_id>"));
	data.add(new BasicNameValuePair("type", "nix")); //Your device type
	data.add(new BasicNameValuePair("version", "100")); //Your program version
	data.add(new BasicNameValuePair("update_status", "<your_action_uuid>"));
	data.add(new BasicNameValuePair("lip", "192.168.1.2")); //The IP you would like to shown in $ip field in Action String
	data.add(new BasicNameValuePair("luser", "testuser")); //The user you would like to shown in $user field in Action String
	data.add(new BasicNameValuePair("laction", "A")); //'Y' indicates showing "action string" message. 'N' showing "action string when lock" message. 'A' shows message depending on autolock status set in omamori portal.

	httppost.setEntity(new UrlEncodedFormEntity(data, "UTF-8"));

	HttpResponse response = httpclient.execute(httppost);
	try {
		HttpEntity entity = response.getEntity();

		if (entity != null) {
			InputStream instream = entity.getContent();
			try {
				String jsonStr = EntityUtils.toString(entity);

				JSONObject json = new JSONObject(jsonStr);

				String jRes = json.getString("result");
				if(jRes.equals("success")) {
					int flag = Integer.parseInt(json.getString("actionFlag"));

					if(flag>=4) {
						//Phone notification is on
						flag -= 4;
					}
					if(flag>=2) {
						//Email notification is on
						flag -= 2;
					}
					if(flag>=1) {
						//Autolock is on
						rtnFlag = false;
					} else {
						//Autolock is off
						rtnFlag = true;
					}
				} else if(jRes.equals("fail")) {
					/* Handle error */
					System.out.println(json.getString("msg"));
				}
			} finally {
				instream.close();
			}
		}
	} finally {
		response.close();
	}

	return rtnFlag;
}